This guide is meant for ADVANCED users who are looking to customize their ECS components in their Limina deployment. This guide walks through a security focused, component by component deployment and is NOT recommended for new users. If you are looking for the quickest way to deploy Limina on AWS, please have a look at either our EKS Guide or our Automated ECS Guide
1. Prerequisites
Before you begin, you will need to install the AWS CLI and Docker tools. Please also see our installation documentation for more information on how to retrieve the Limina docker image.2. Create VPC
AWS resources such as ECS are connected to a virtual private cloud. In order to segregate the Limina cluster from the rest of your cloud deployment, it is preferable to create a new VPC. Check What is Amazon VPC for more details, or follow the instructions below.The default VPC in AWS has special properties, and not all of this guide may be relevant. Check Default VPCs for more information.
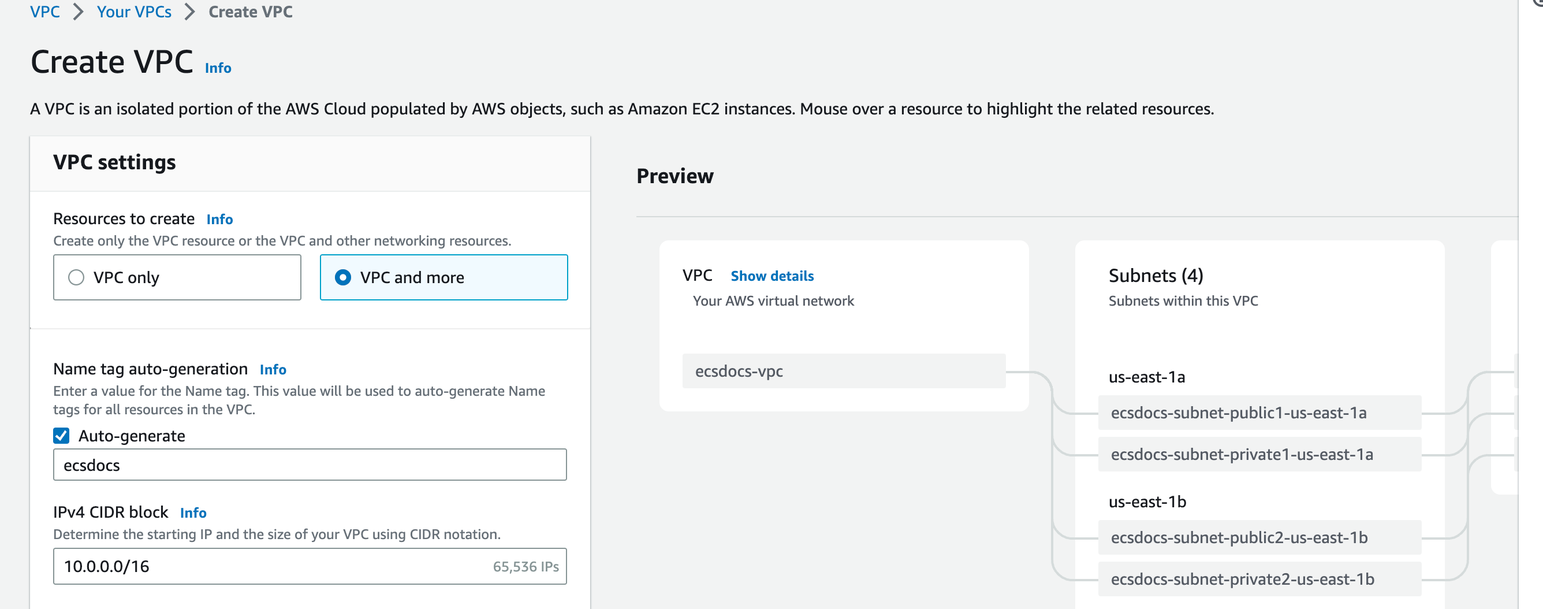
Creation of the individual subnets, route tables, and network connections are beyond the scope of this article.
3. Policy Creation
In order to create and manage the Limina cluster, we will create a new Policy with the minimum permissions to effectively manage the cluster with a single user.If you have a production environment with segregation of duties, you may not want all permissions in a single policy.
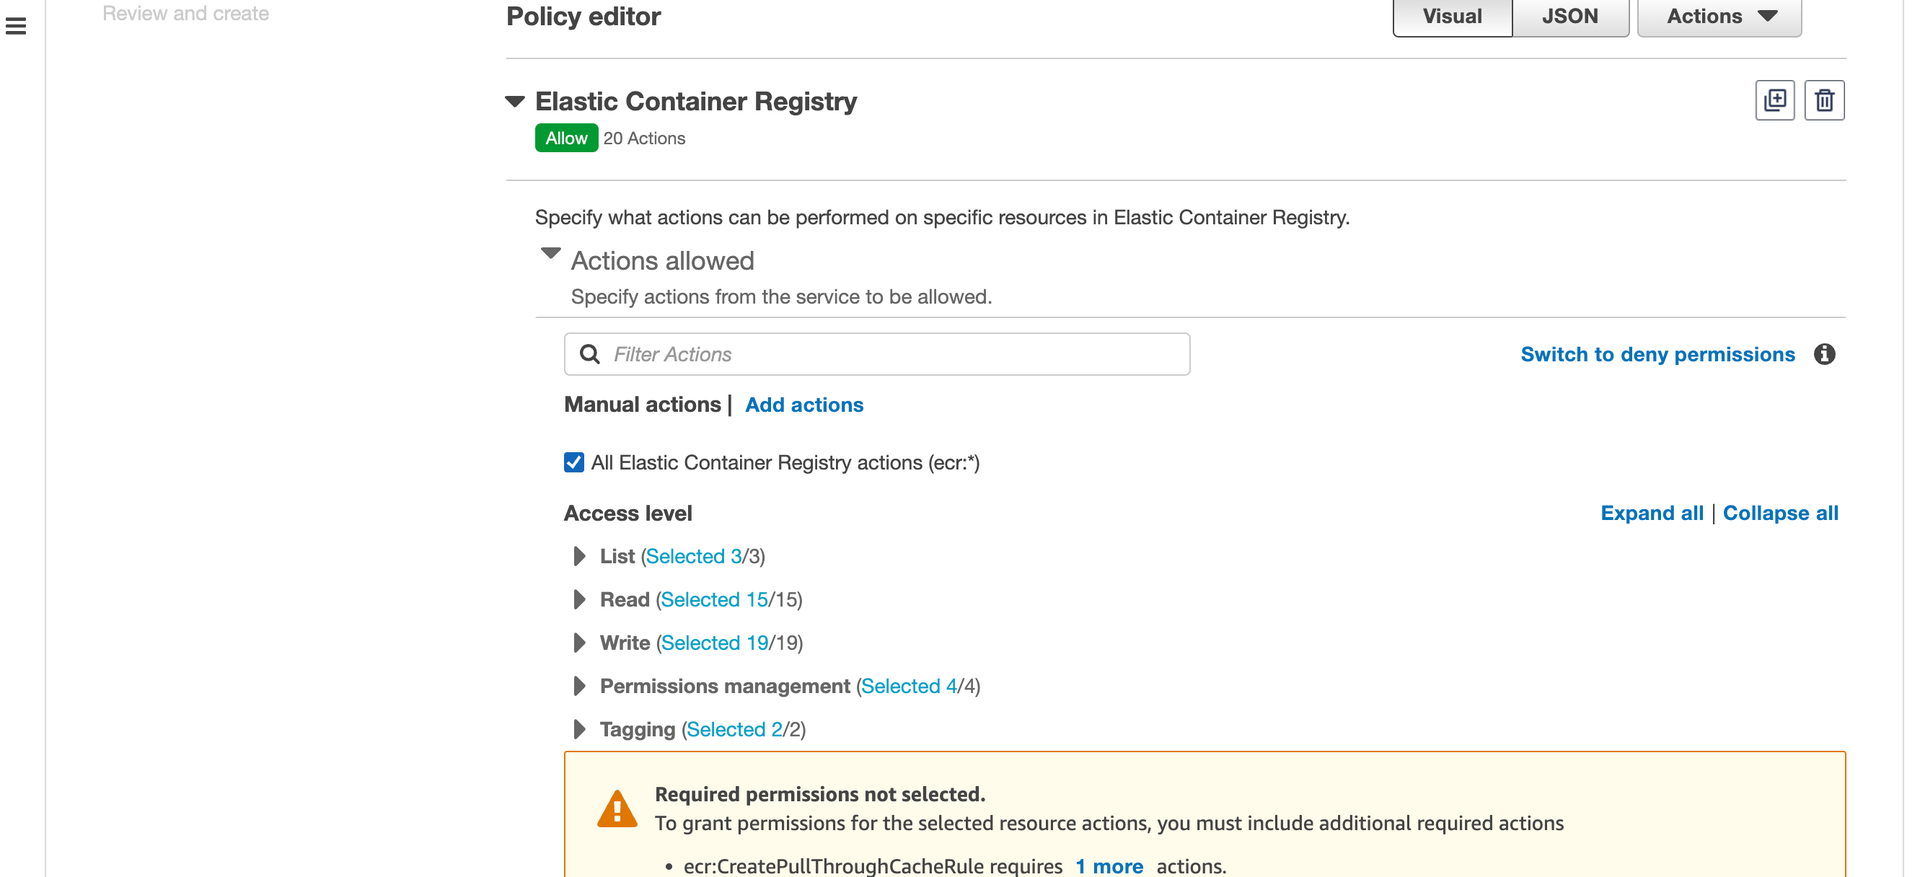
Expand “Resources”, select “This account”, “Add ARN” and specify the region your container will be hosted in. For example “us-east-1” or “ca-central-1”. Enter “*” for repository and click “Add ARNs”.
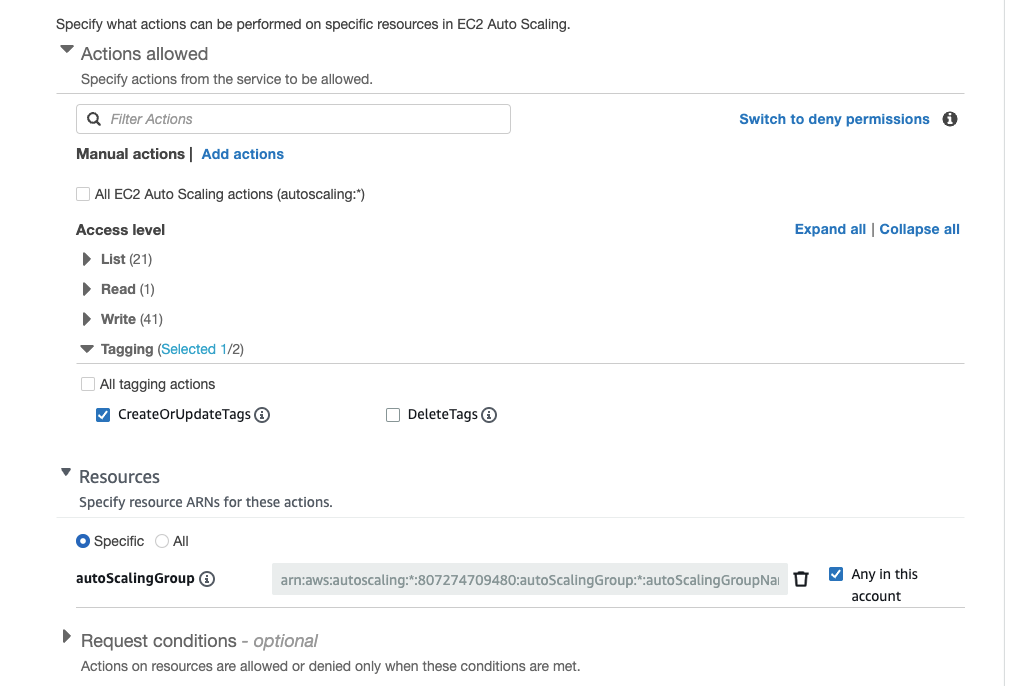
Expand “Write” and select “AllocateAddress”, “AuthorizeSecurityGroupEgress”, “CreateLaunchTemplate”, “CreateLaunchTemplateVersion”, “CreateNatGateway”, “ModifyLaunchTemplate”, “RevokeSecurityGroupEgress”, “StartInstances”, “StopInstances”, and “TerminateInstances”.
Expand “Resources” and select “Any in this account” next to the “elastic-ip”, “instance”, “launch-template”, “natgateway”, “security-group”, and “subnet” resources.
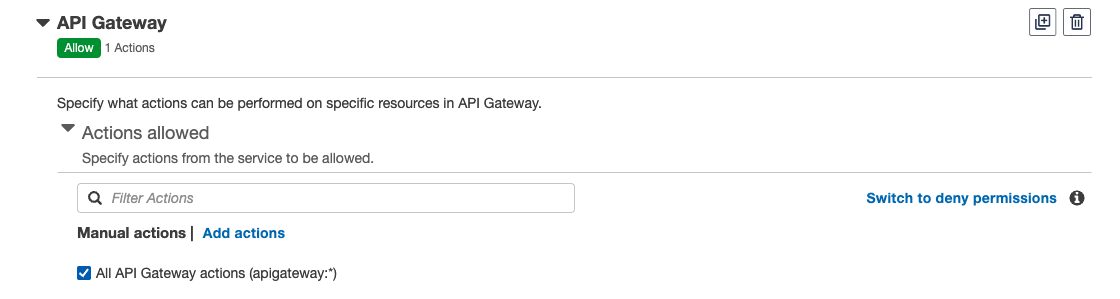
Expand “Resources” and select “Any” next to “Api”, “Apis”, “IntegrationResponses”, “Routes”, and “Stages”.
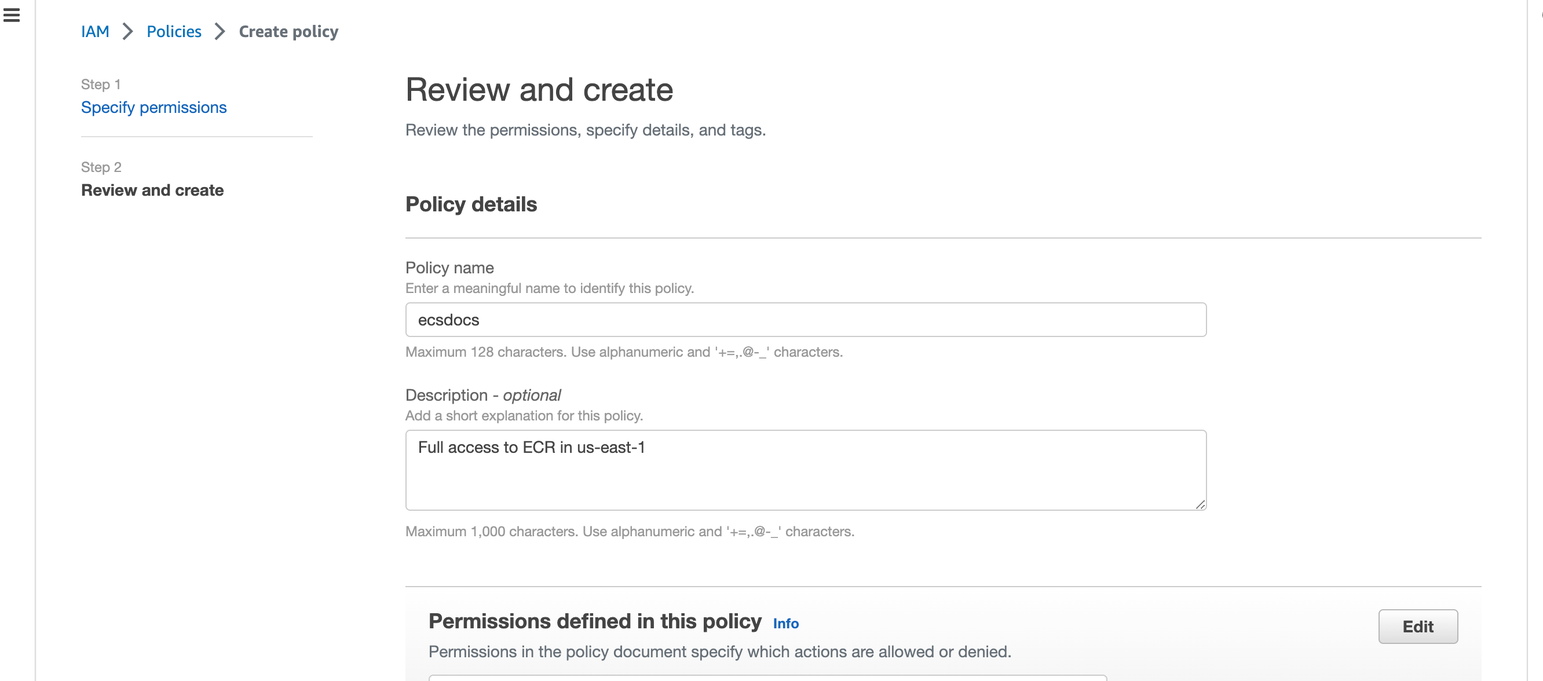
Full Policy
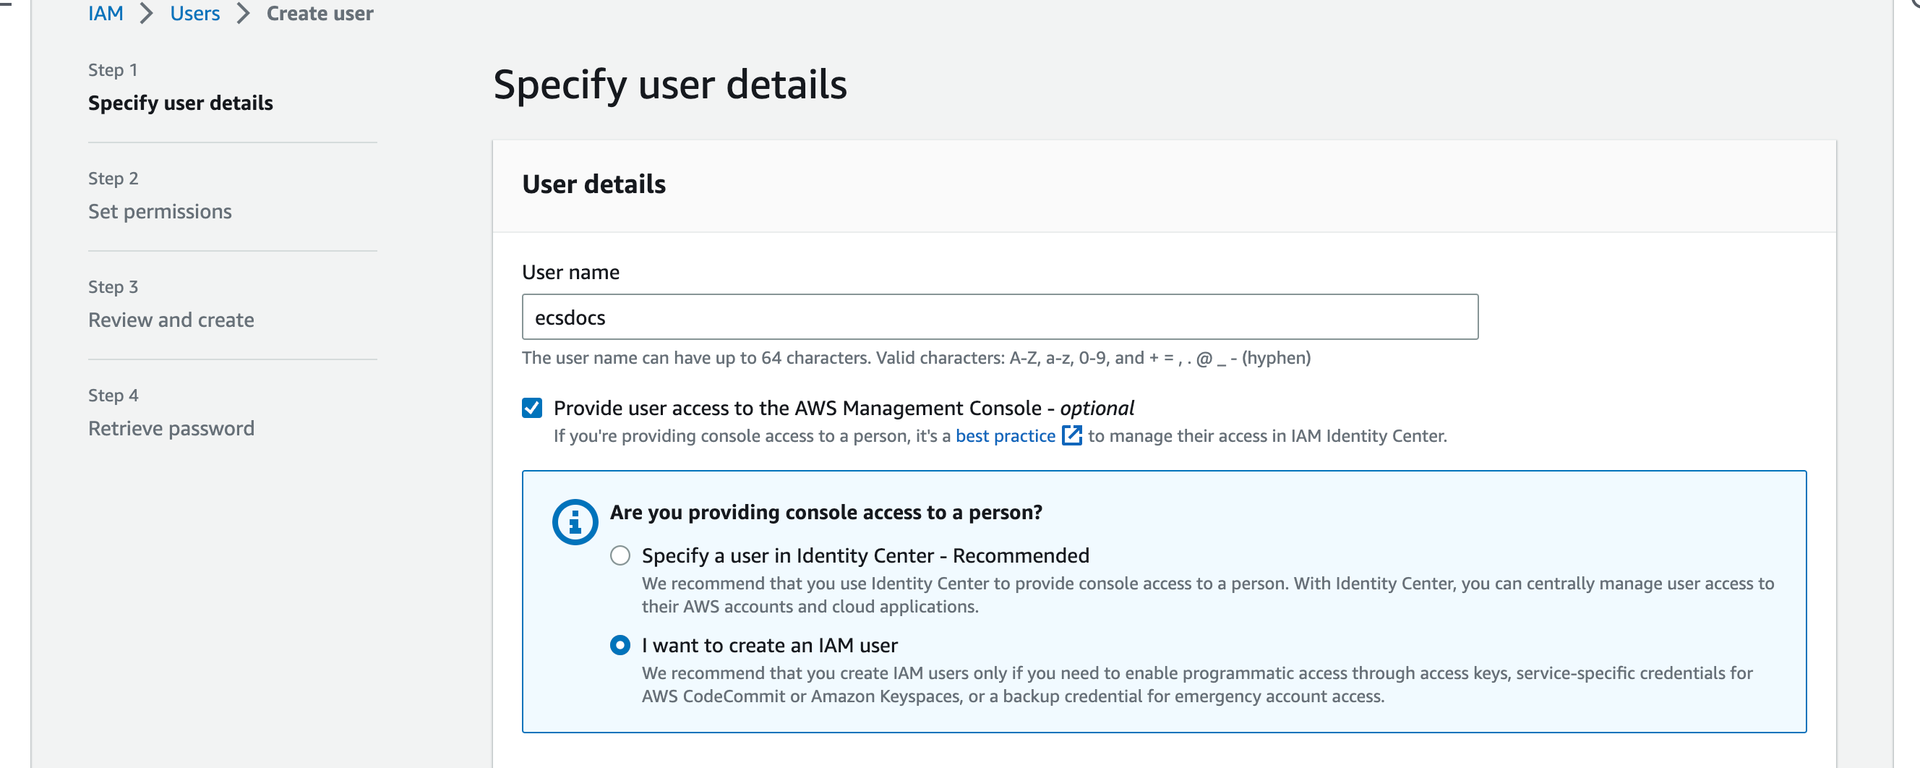
4. Create IAM User
For the purpose of this article, we will use a single user account to create and manage all required Limina cluster resources.For production environments, you will likely want to separate these tasks into several individually named user accounts, or automatically build this environment using infrastructure-as-code checked into source control and deployed via a pipeline.
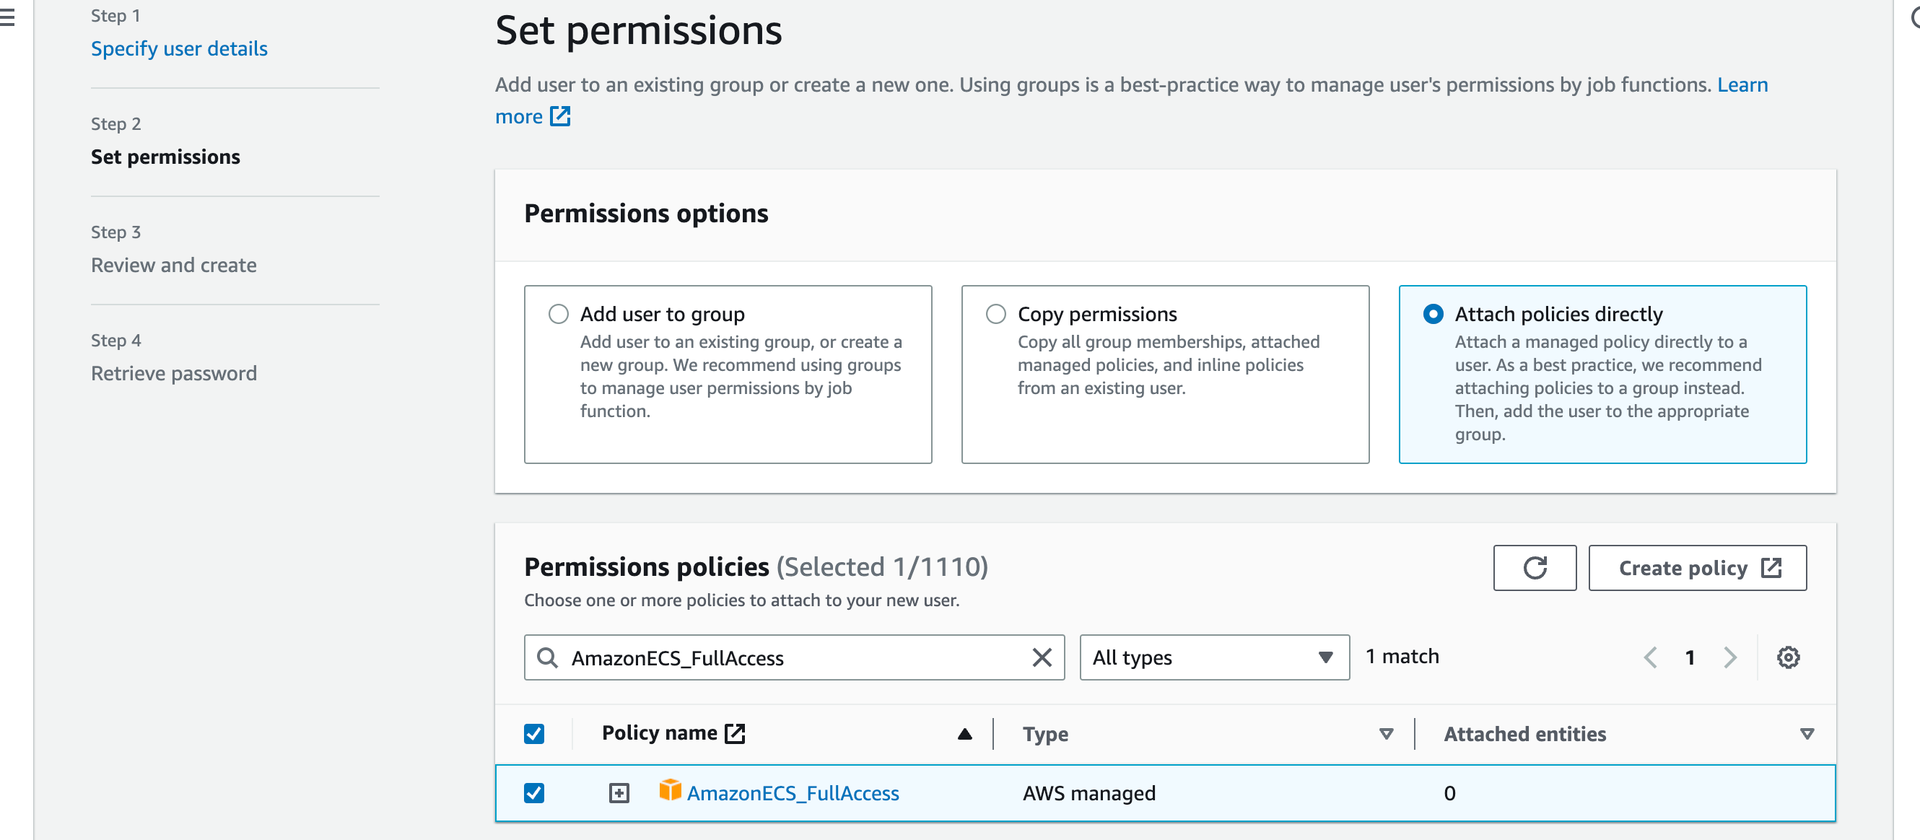
In a production environment, you will likely want to limit the permissions to ECS and EFS, and not use the “AmazonECS_FullAccess” and “AmazonElasticFileSystemFullAccess” policies directly.
Once your user is created and the policies attached to the user, log in to this account to continue the setup.
Follow the Create key pairs guide to create an SSH key-pair for your account.
It is highly recommended to configure the account with MFA, which is beyond the scope of this article. Check Multi-Factor Authentication for more information.
5. Create ECR Repository and Upload Limina Container
In order for an ECS cluster to start a task, the cluster must have access to the Limina De-identification container. This can be accomplished by pulling the latest Limina container, re-tagging it, and pushing it to the AWS Elastic Container Registry.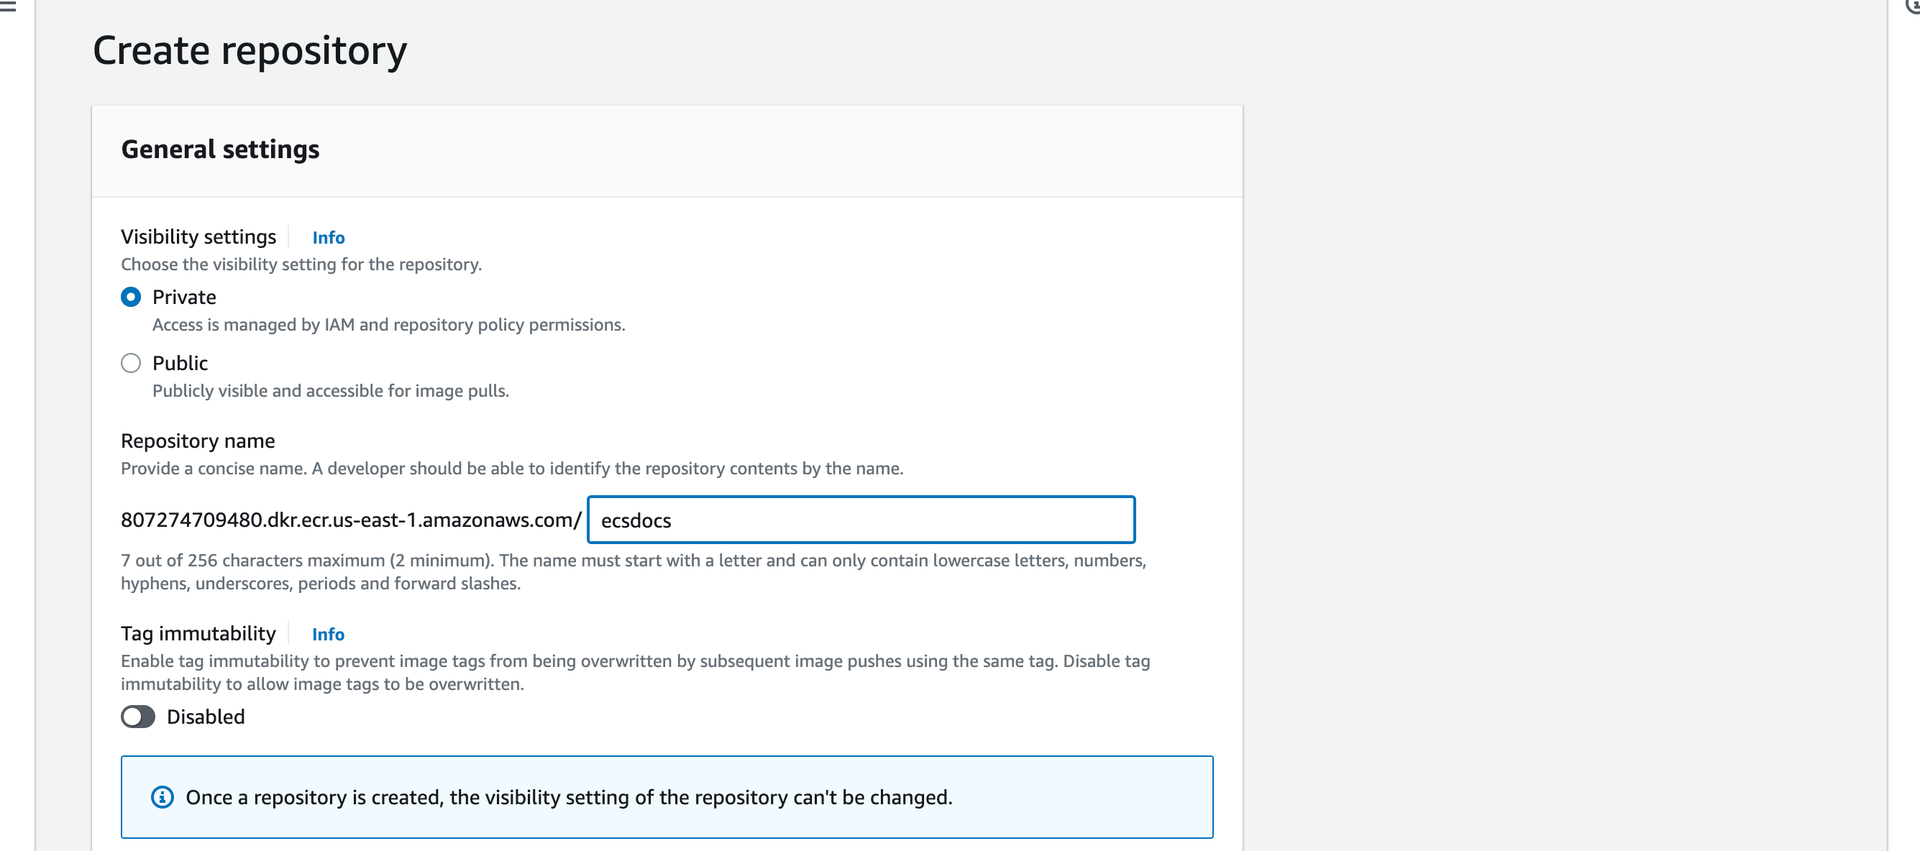
Select the repository from the list you just created and then click “View push commands” in the top right corner. A pop-up window should appear with copy-and-paste-able commands.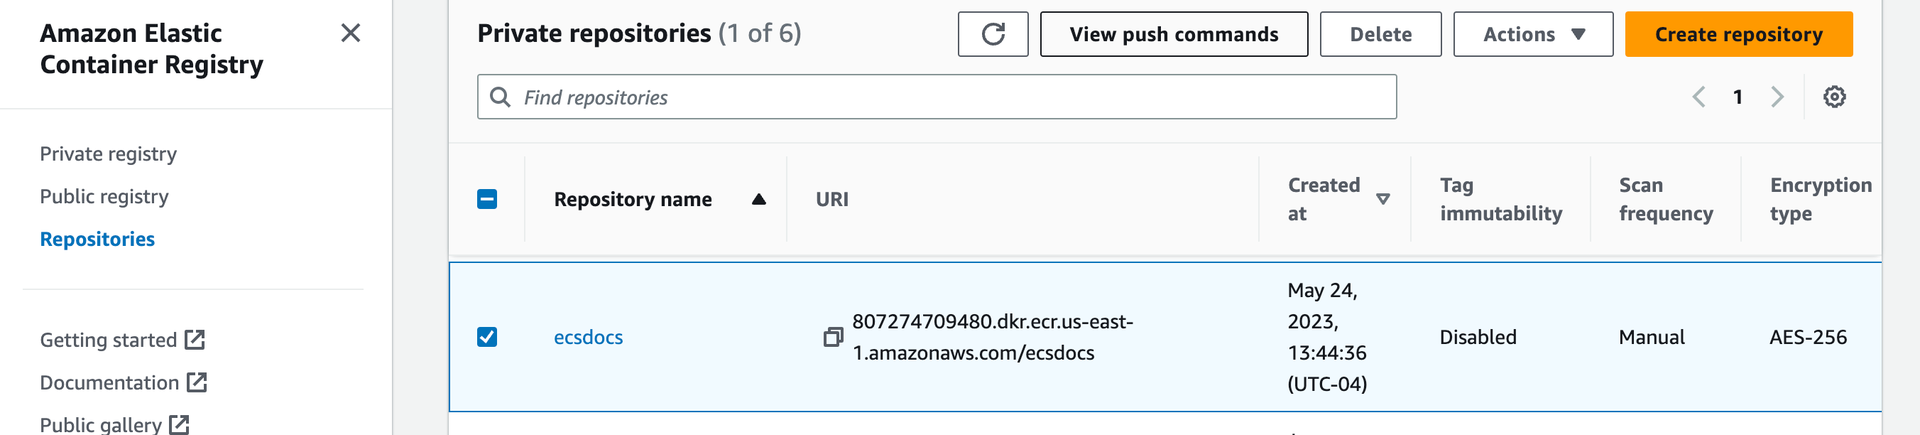
Copy the text from the first field under: “Retrieve an authentication token and authenticate your Docker client to your registry”. It should look like this:
AWS Command
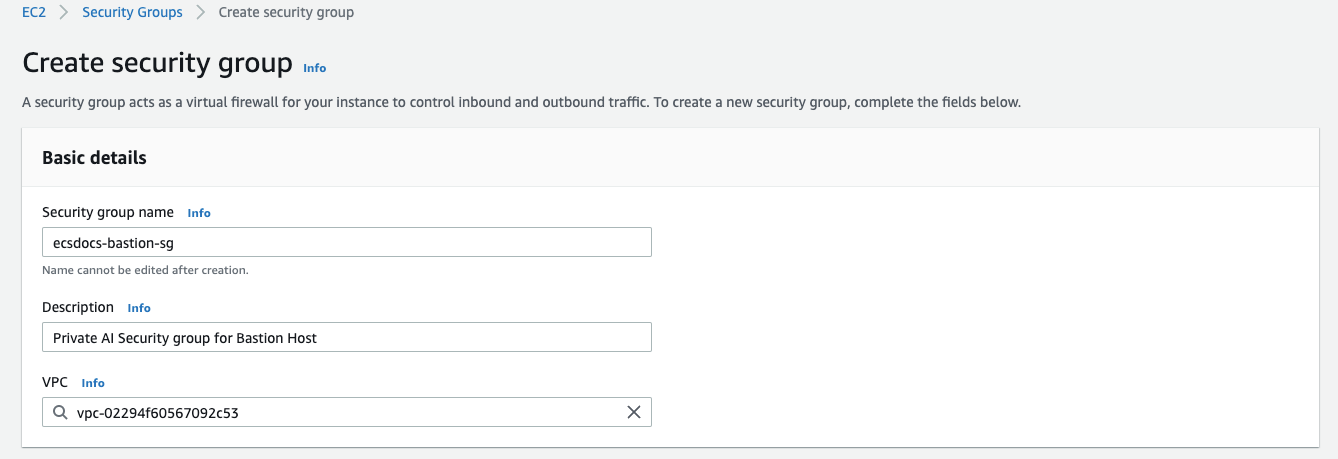
6. Create Security Groups
In order for the Limina De-identification task to have the correct network connectivity, EC2 Security Groups must be created. These groups will allow inbound and outbound network connectivity for the EC2 host used for the ECS cluster, the EFS endpoint, and the Load Balancer. We will additionally create a security group for an EC2 bastion host, which can be used to managed the cluster, EFS, and provide troubleshooting.If you are running the Limina container in AWS FARGATE alone, some of these steps may not be needed.
Navigate to the “EC2” dashboard and select “Security Groups” from the left side. Click “Create security group” to create a security group for the bastion host.
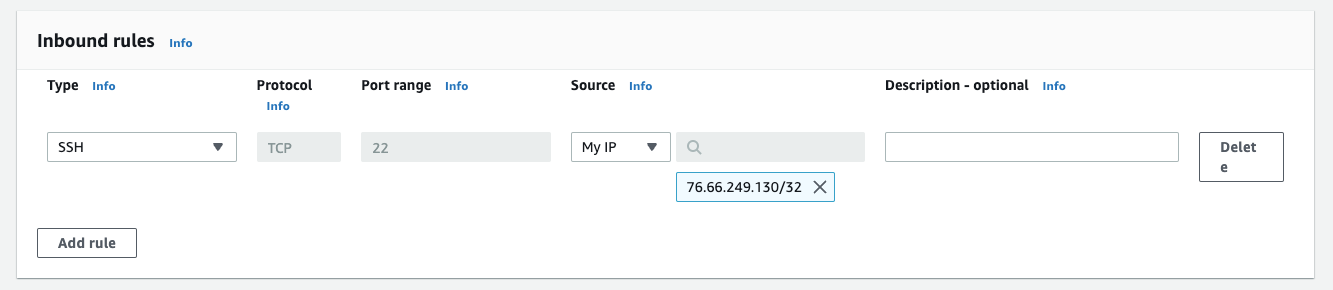
Navigate to the “Security Groups” dashboard and click “Create security group” again to create a second security group for the ECS hosts.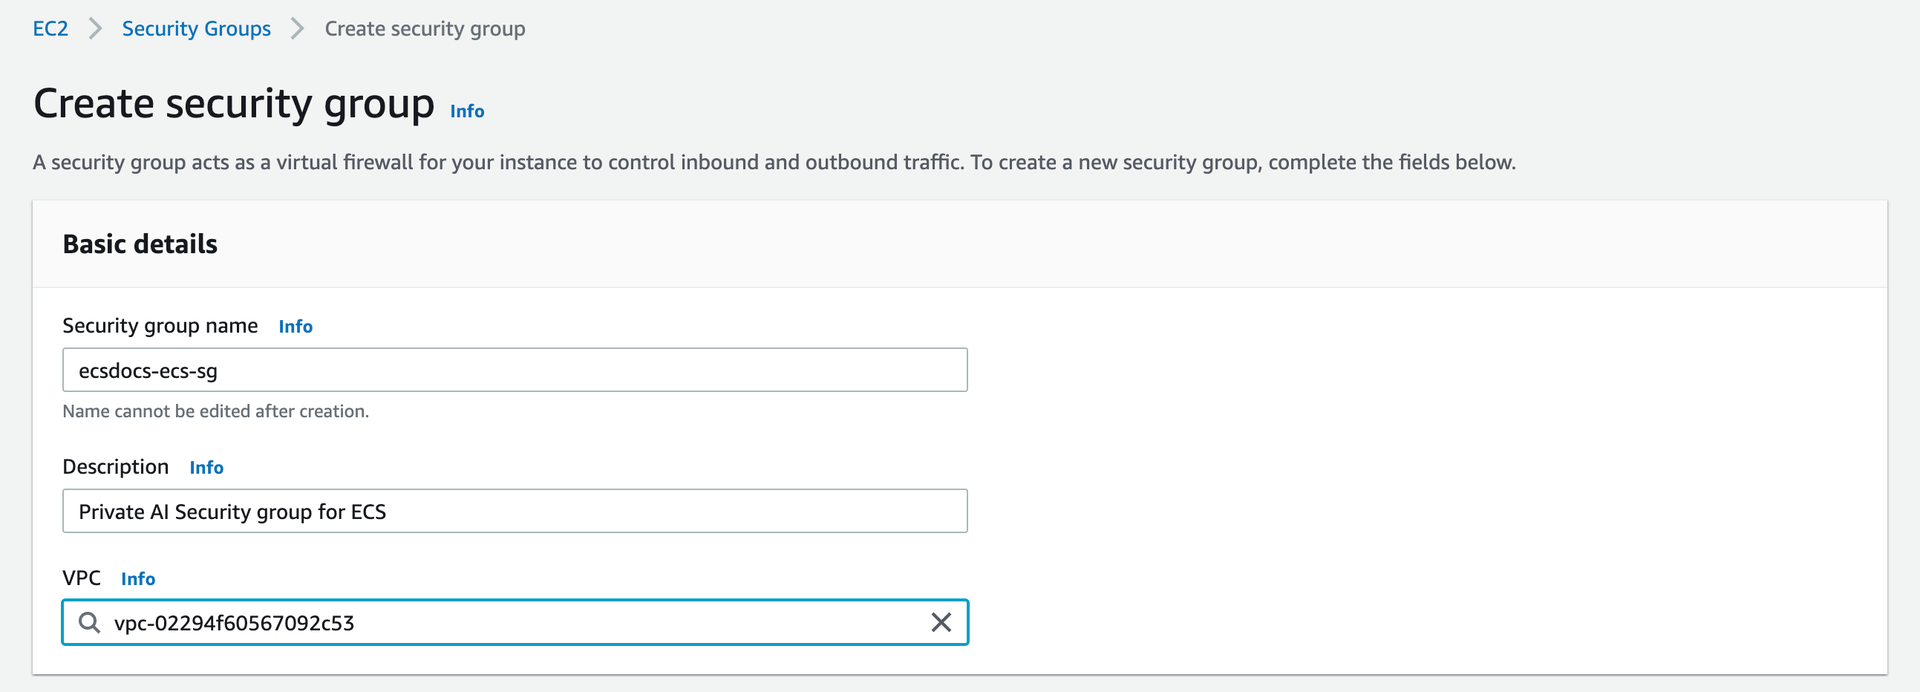
Add the following two “Inbound rules”: one for HTTP access to the container, and one for SSH access from inside the VPC.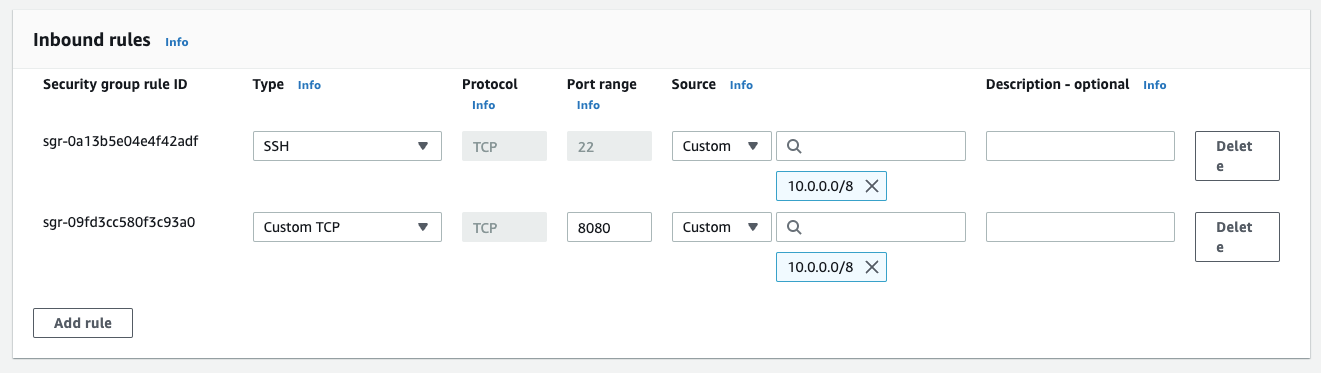

Navigate to the “Security Groups” dashboard and click “Create security group” again to create a third security group for access to the EFS mounts.

Add the following two “Inbound rules”: one to allow access from the ECS cluster to the EFS service and one to allow access from the bastion host to the EFS service.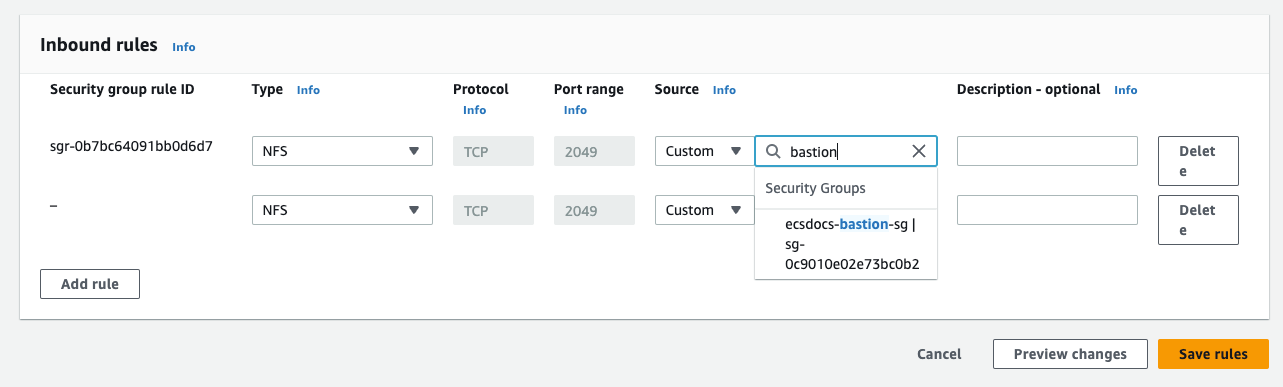
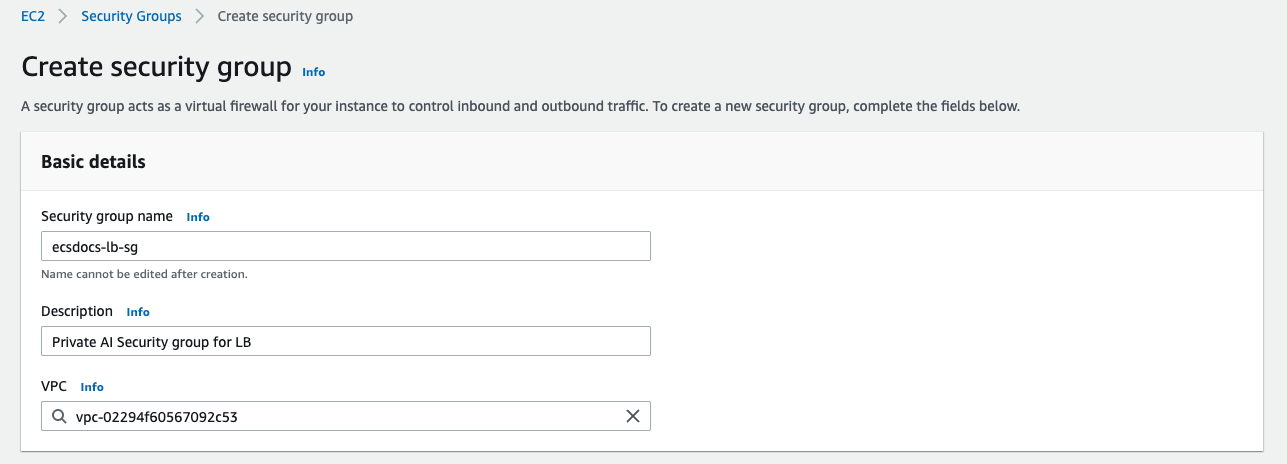
Navigate to the “Security Groups” dashboard and click “Create security group” again to create a fourth security group for the Load Balancer.
Add an “Inbound rule” to allow HTTP access from the VPC CIDR created in a previous section (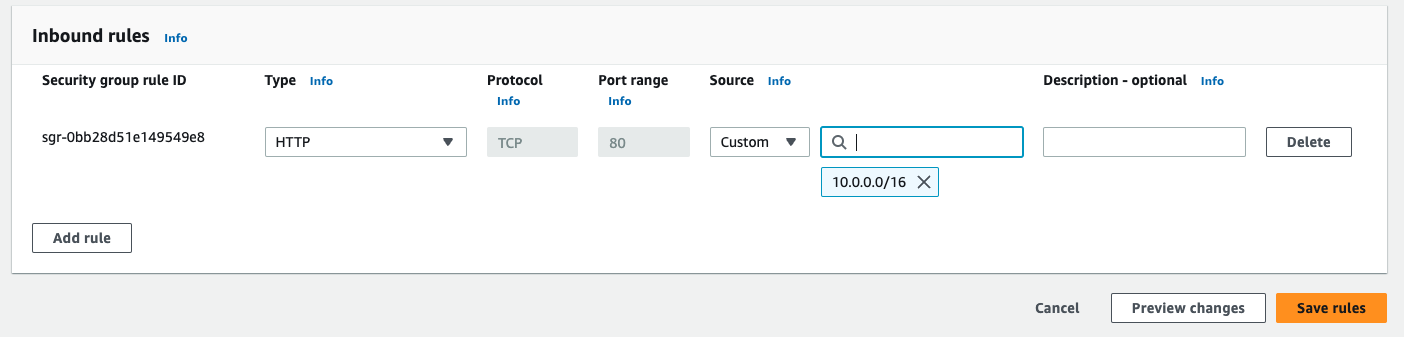
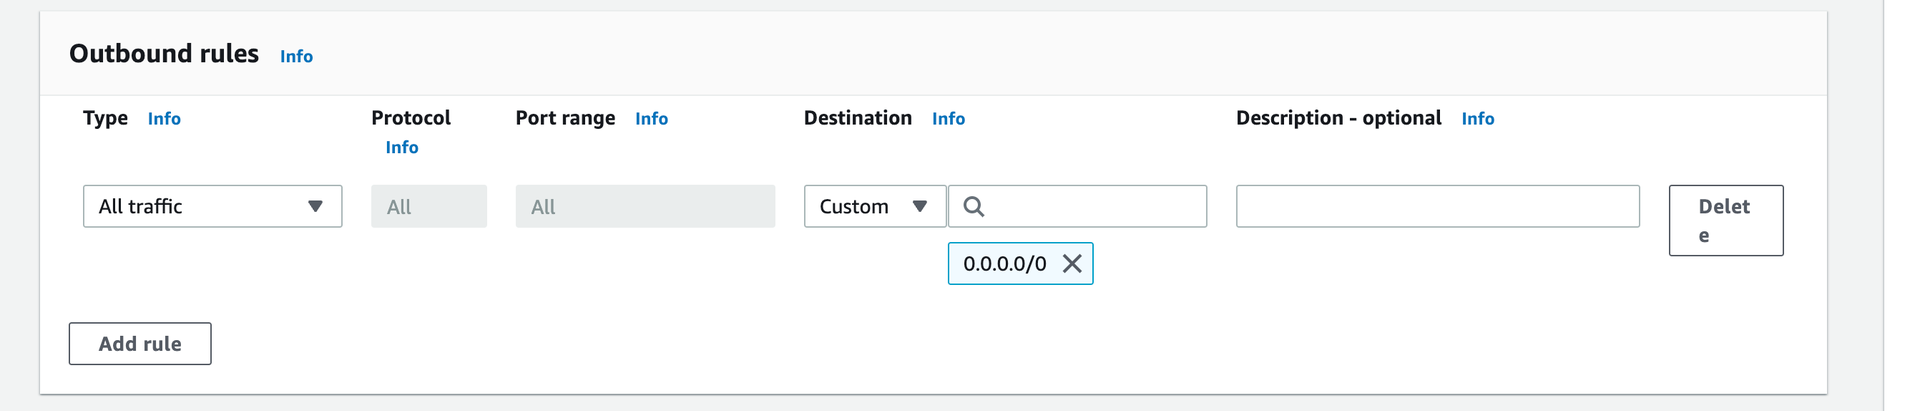
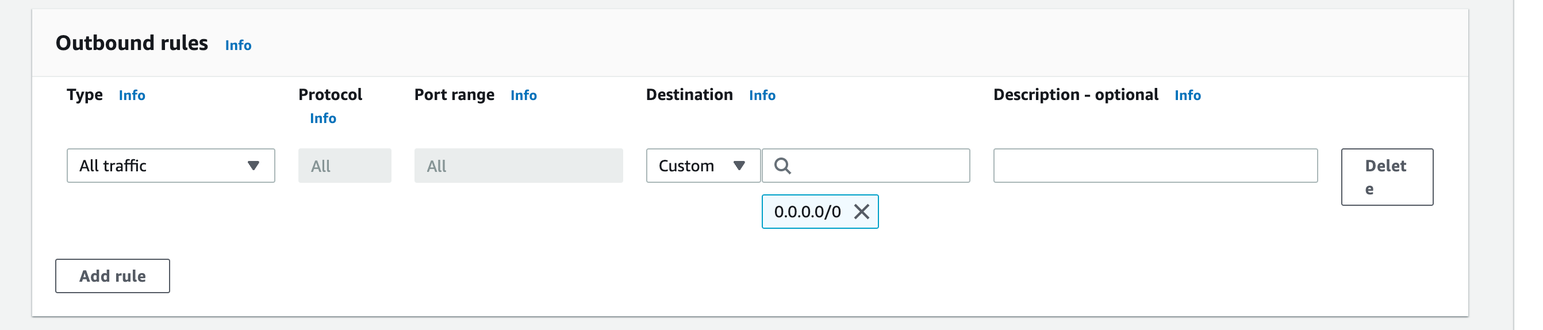
10.0.0.0/16) if you prefer an internal load balancer, or to allow HTTP from the Internet (0.0.0.0/0) if you prefer an internet-facing load balancer.Remove the default “Outbound rule” and add a new rule to allow traffic to the instance on port 8080. Set the destination to the ECS security group created previously.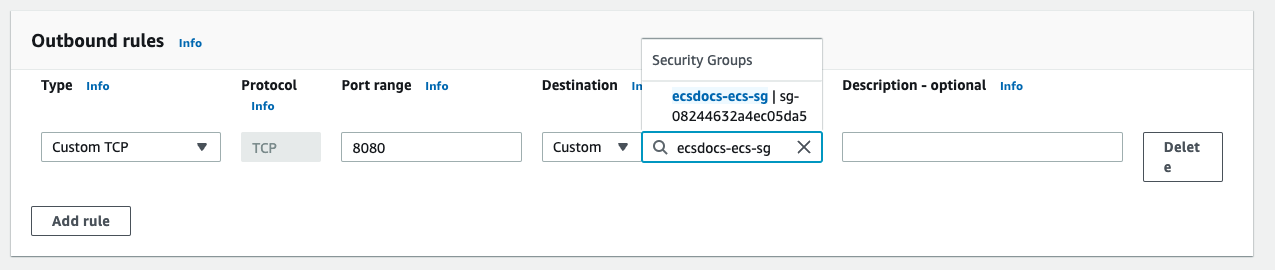
Leave the default “Type” of “Custom TCP”, change the “Port” to 8080, and enter the “Source” of the security group for the load balancer created in a previous step.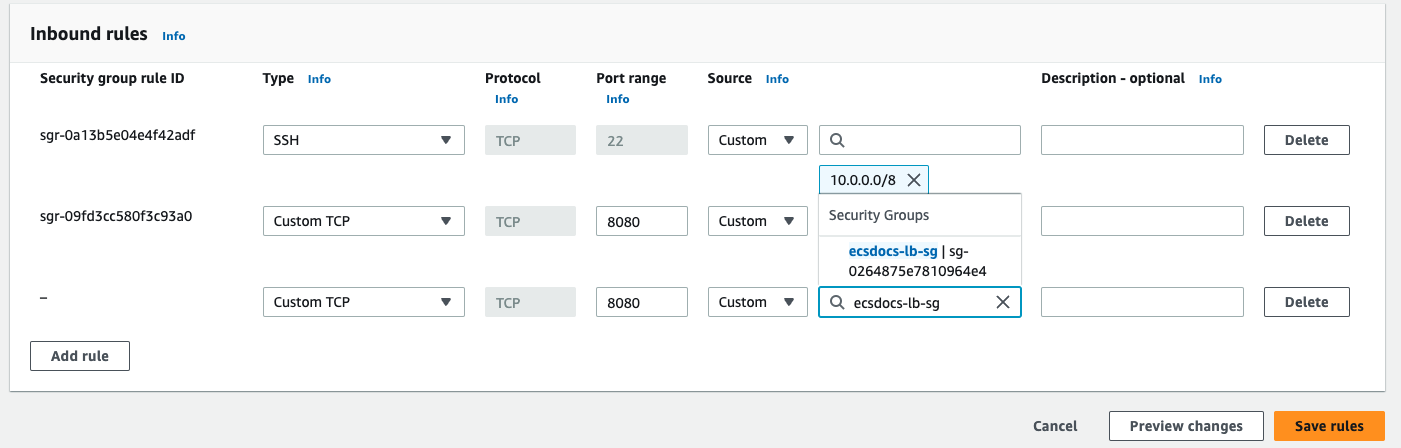
It is recommended for inbound and outbound traffic in a production environment be analyzed by your security team to match with your deployment strategy and risk posture.
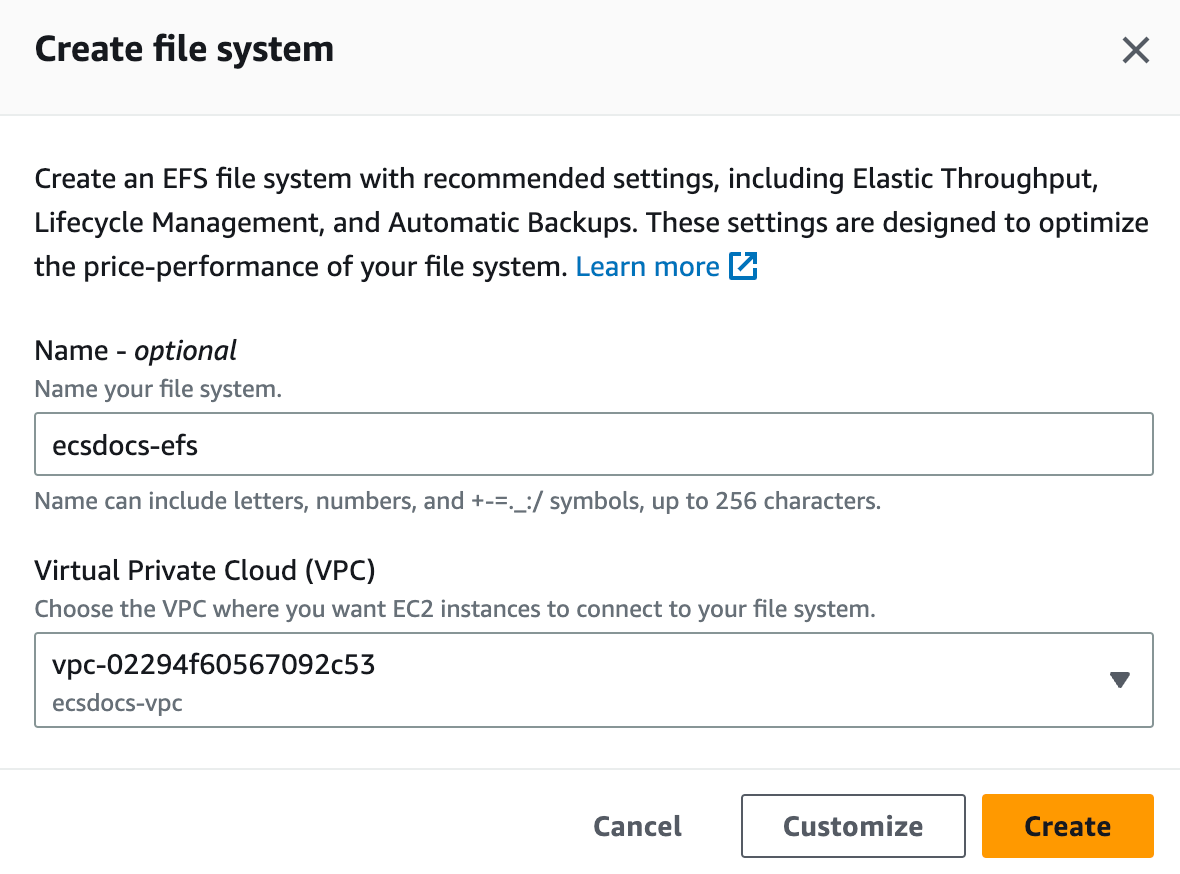
7. Create EFS Mount
The Limina De-identification service requires access to a license file on startup. If you are running an ECS cluster, each container must have access to the file. Mounting an EFS resource is one way to ensure the file is available to each container.
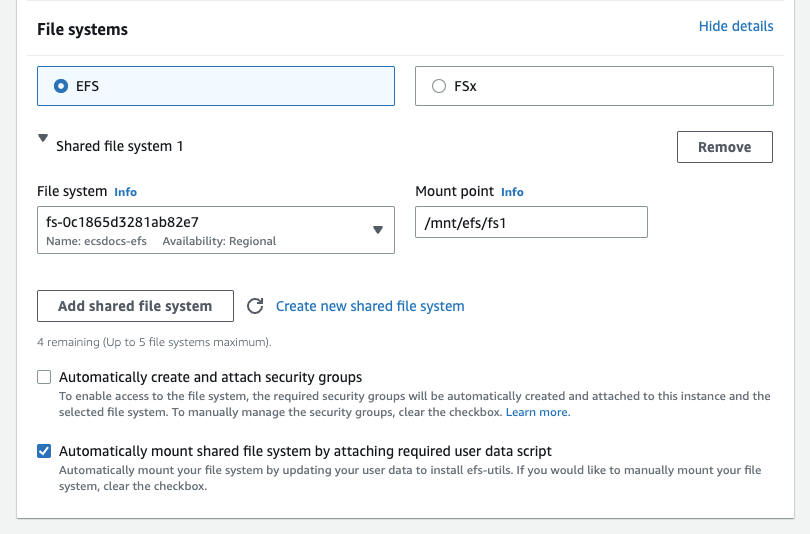
For “Network” remove the default security groups add the previously created EFS security group for each Availability zone, and click “Next”.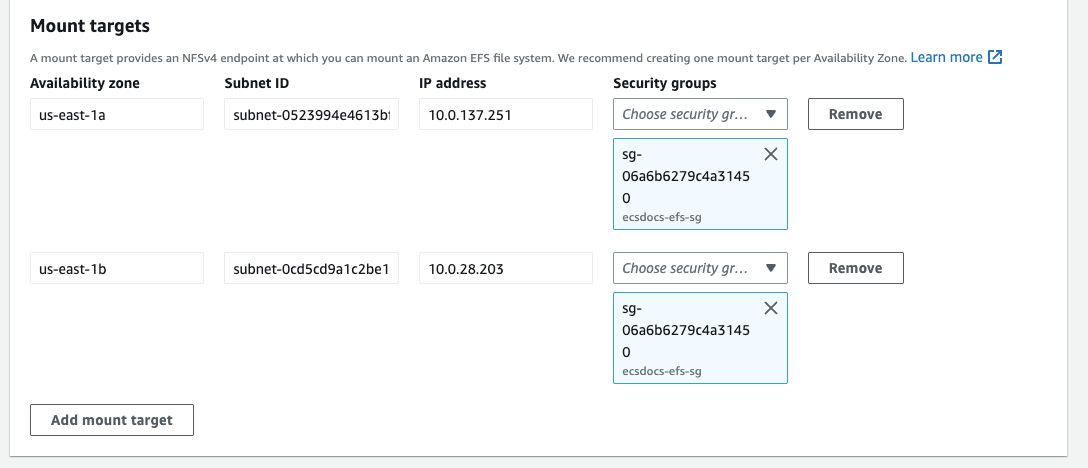
8. Create EC2 Launch Template
In order to provide EC2 hosts for the ECS cluster, an EC2 Launch Template is required.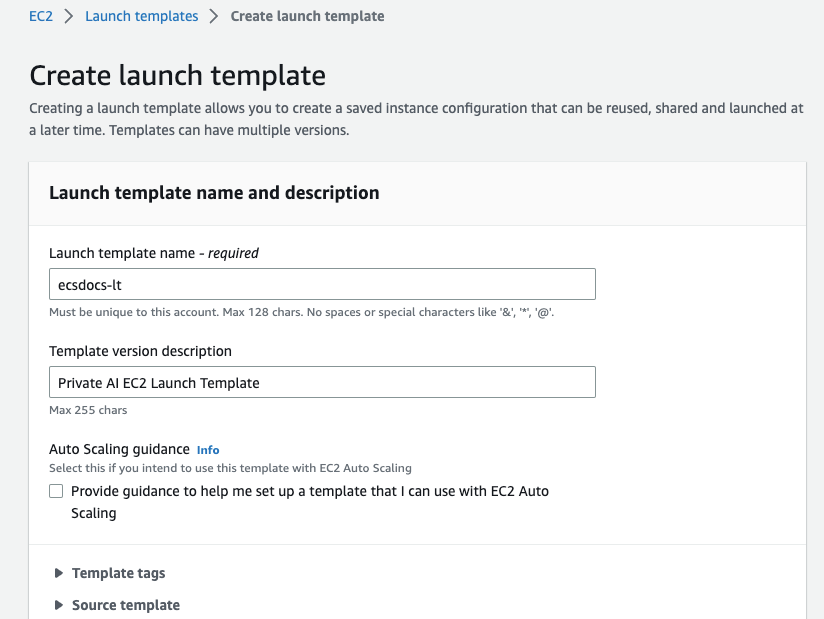
For “Application and OS Images (Amazon Machine Image)” search for Amazon ECS-Optimized Amazon Linux 2023 x86_64. Click the “AWS Marketplace AMIs” tab and click “Select” and “Continue”.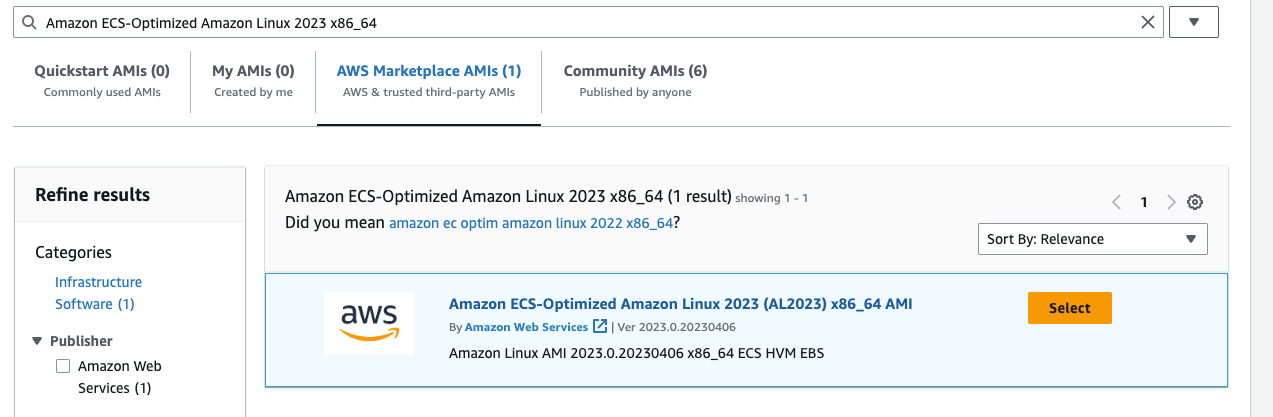
For “Instance type” select an appropriate instance type for your workload. For this document, we will use m5zn.xlarge since the ECS agent uses some of the host memory, this instance type is the optimal instance type for use with Limina’s container. A 2 vCPU instance will give about 1.8M words per hour throughput. Image and PDF processing takes a lot more compute power, for which we recommend choosing a larger instance type such as the m5zn.3xlarge. Please refer to Benchmarks for more information.
For “Key pair (login)” include an SSH key pair if you wish to SSH into your EC2 instance. Key pair creation is beyond the scope of this document, but check Create key pairs for more information.
For “Network settings” select “Select existing security group” and then select the security group previously created for the ECS cluster.

For “Advanced details” set the “IAM instance profile” to “ecsInstanceRole”.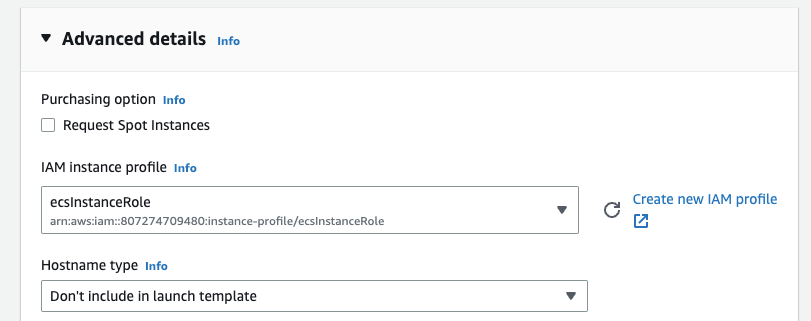
If you do not have an ecsInstanceRole, check Amazon ECS container instance IAM role for more information. It should be automatically created the first time you visit the ECS dashboard.
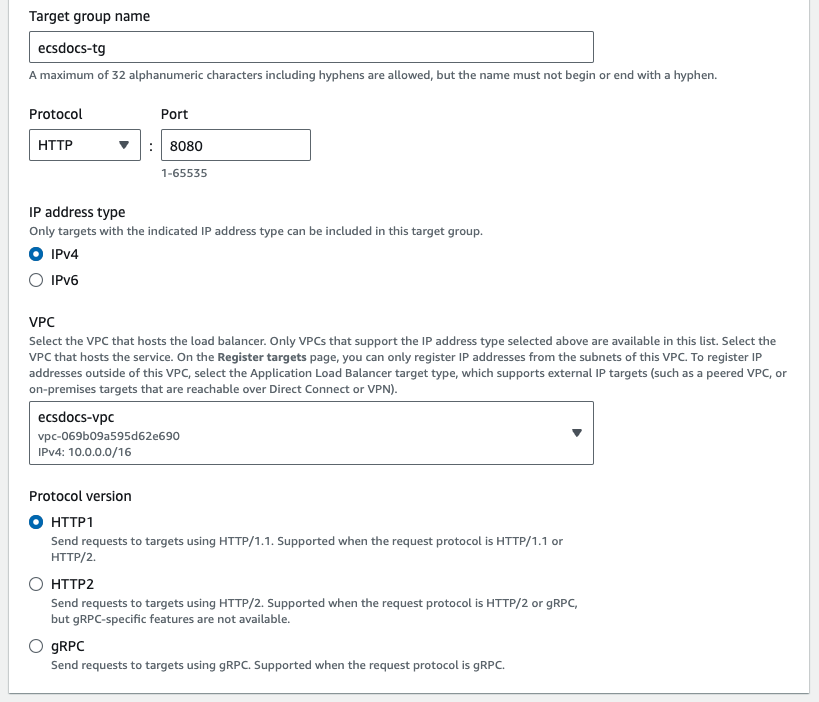
9. Create EC2 Target Group
In order to balance load across multiple ECS tasks, an EC2 target group is required.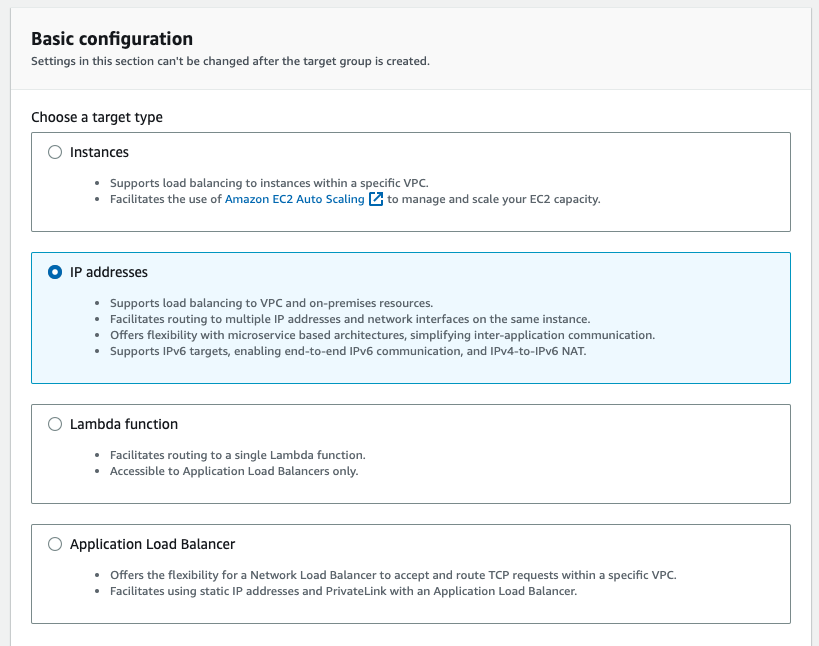
10. Create Load Balancer
In order to balance load across multiple ECS cluster tasks, a load balancer is required.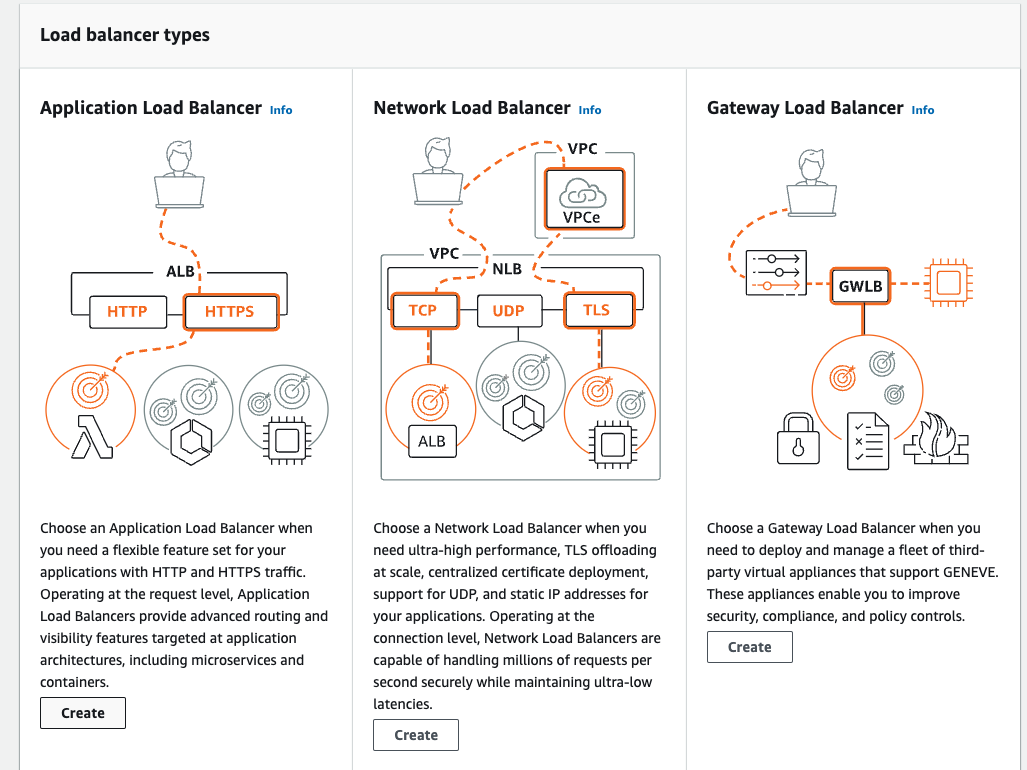
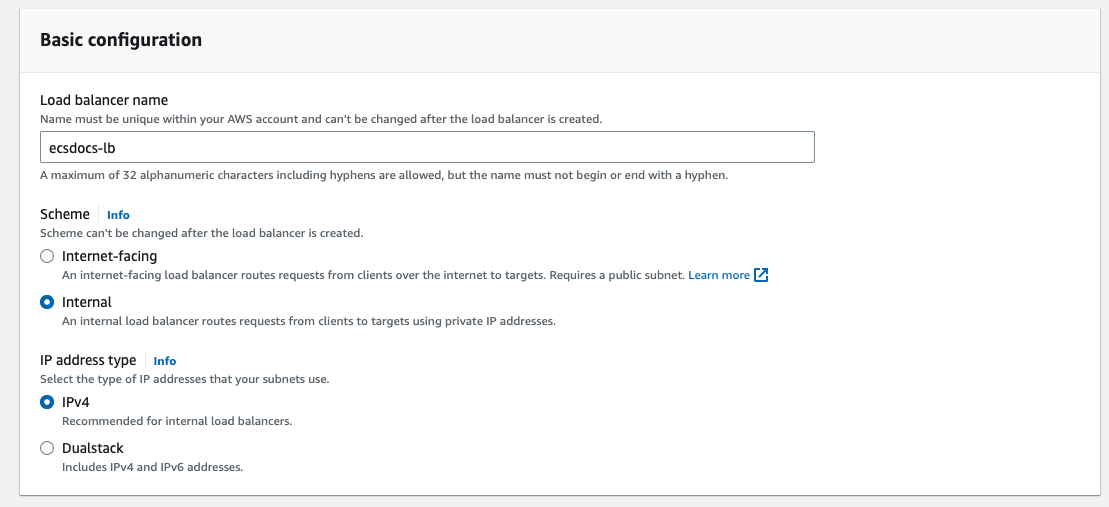
If you plan on protecting the load balancer with an API Gateway, for “Scheme” select “Internal”. Otherwise select “Internet-facing”.
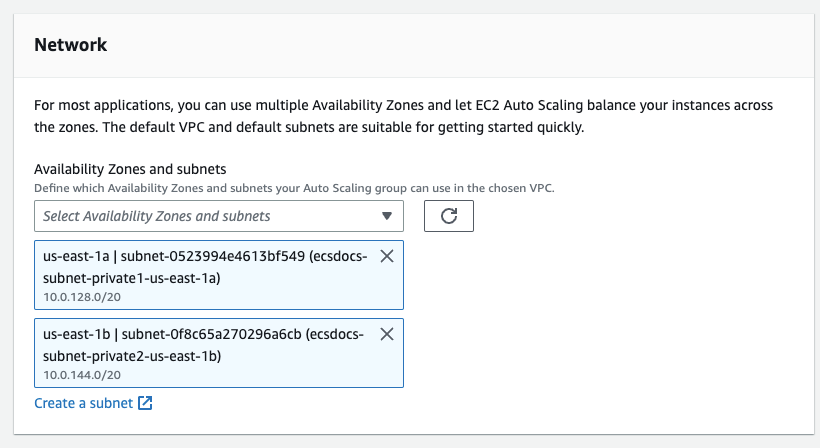
Check the box beside each availability zone and select the appropriate subnet depending on if you are deploying Internet-facing or Internal.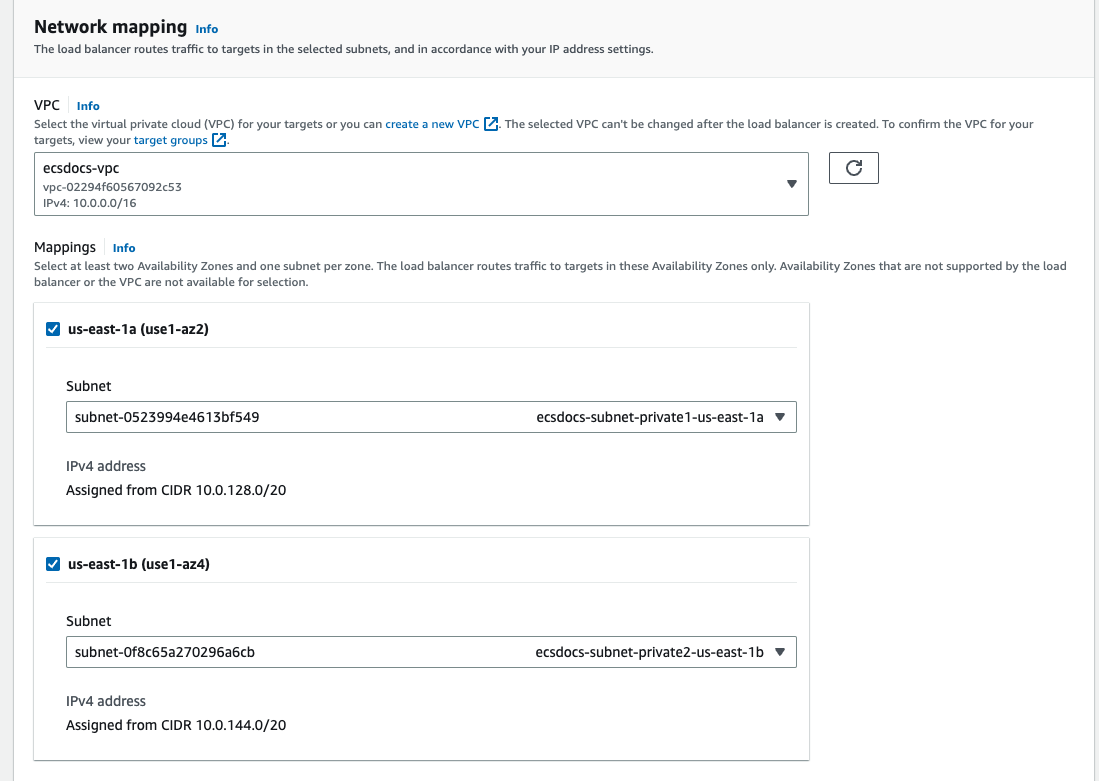
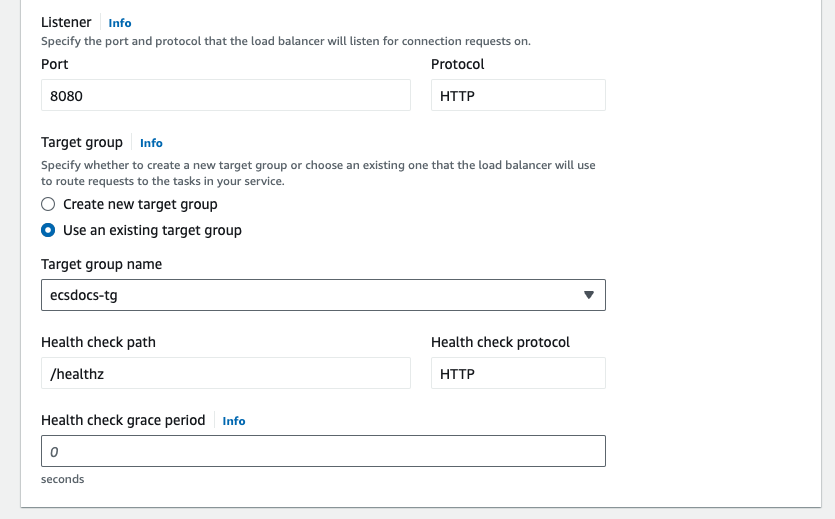
For “Listeners and routing” under “Protocol” select “HTTP” and change the “Default action” to the target group created in a previous section.
For production environments, it is recommended to provision SSL certificates, especially in Internet-facing scenarios. Creation and maintenance of SSL certificates are beyond the scope of this document. Check Create an HTTPS listener for your Application Load Balancer for more information.
Optional - For “Add-on services - optional” and “Load balancer tags - optional” select appropriate settings.
11. Create Auto Scaling Group
In order to use EC2 instances as hosts for the ECS cluster follow the steps below.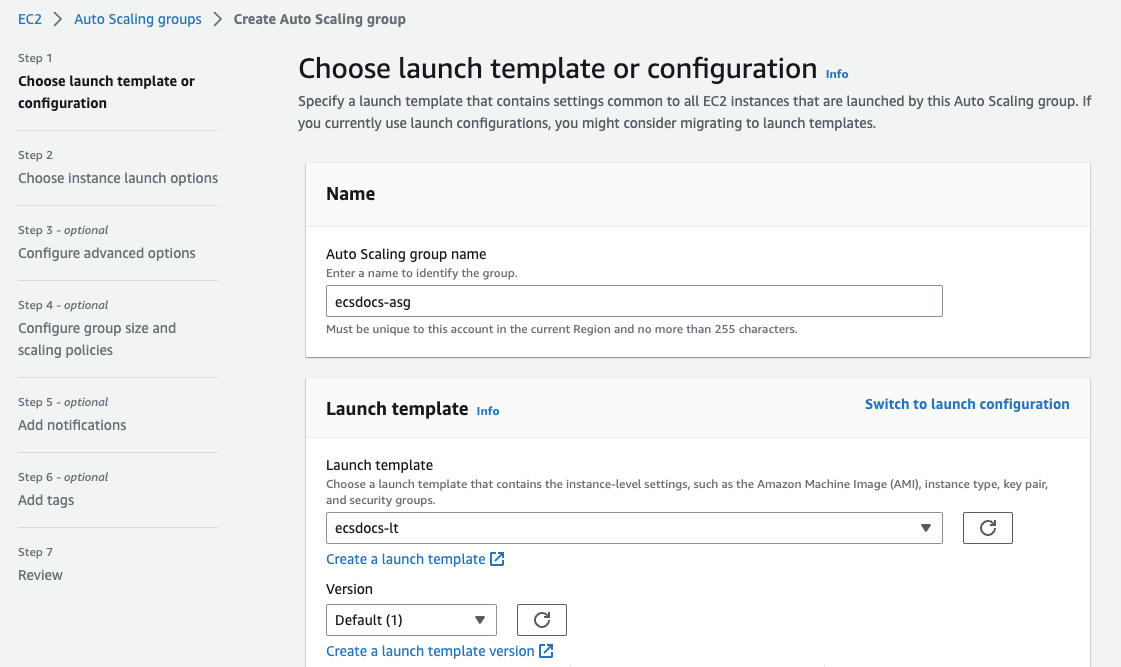
For “Load balancing” select “No load balancer”.
We will be using the load balancer created in a previous section for the ECS Service Tasks, not for the EC2 instances directly.
Optional - For “Additional settings” optionally enable CloudWatch monitoring and instance warmup as required.
For “Group size - optional” set the “Minimum capacity” to “0” and leave the other defaults at 1.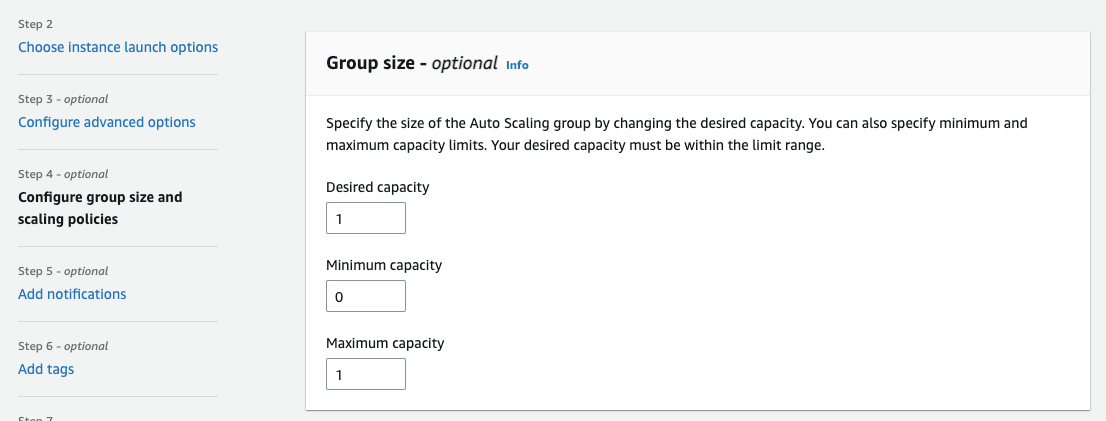
These settings are heavily dependent on your workload and performance, and must be tuned appropriately.
Optional - For “Scaling policies - optional” leave the default of “None” or optionally create a scaling policy.
Optional - For “Instance scale-in protection - optional” leave the default of unchecked or optionally enable scale in protection.
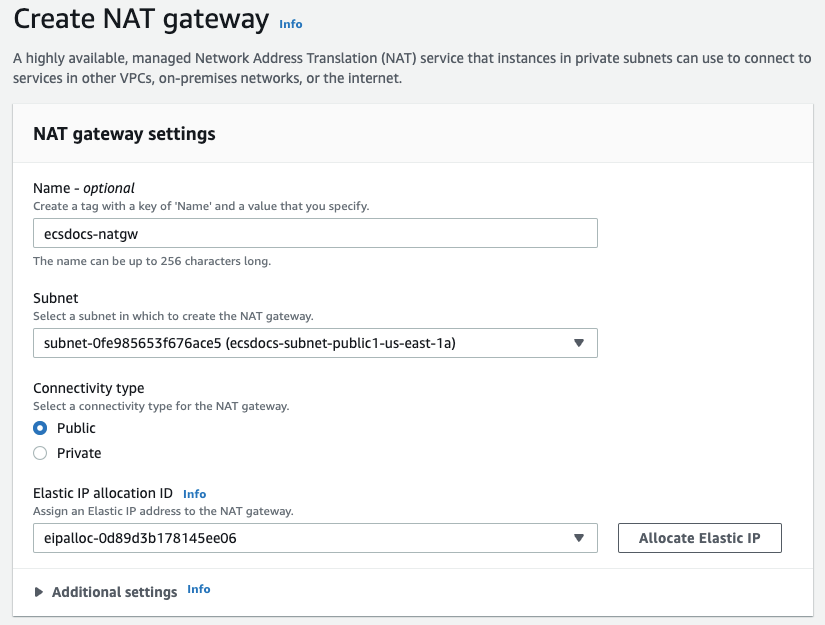
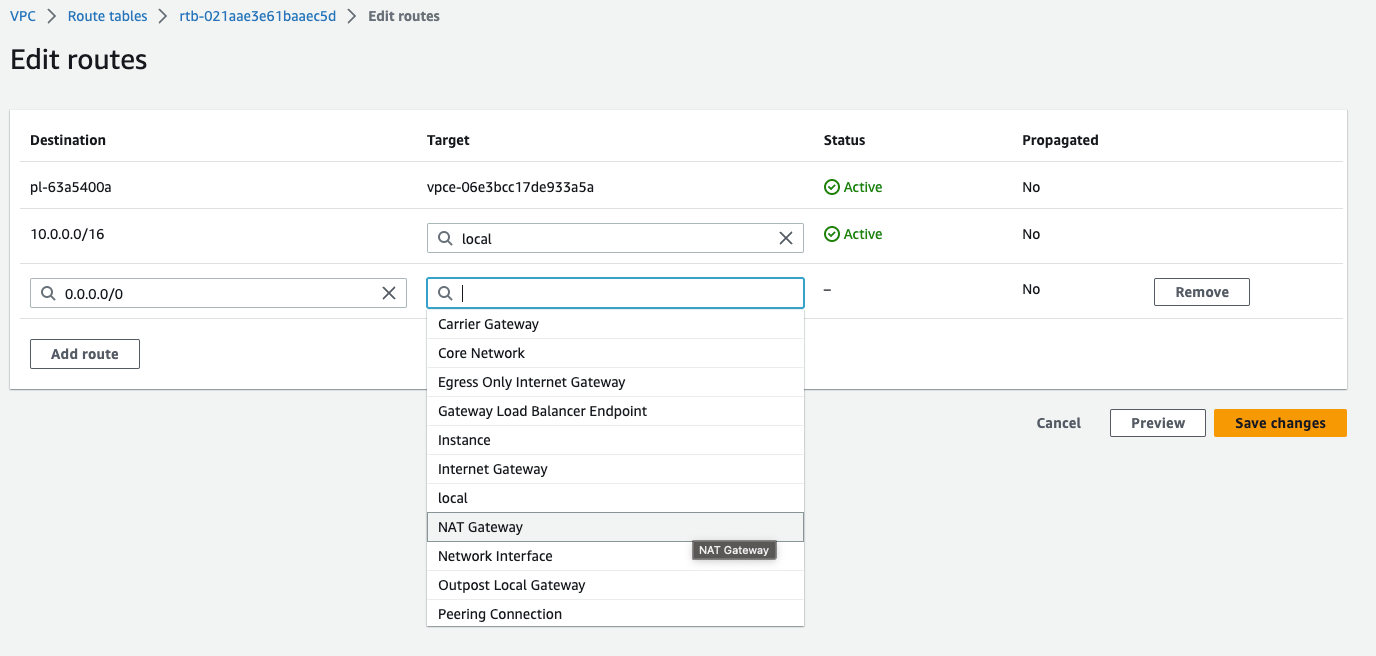
12. Create VPC NAT Gateway
If you have created a non-default VPC, your EC2 instances will not have access to the Internet from the private subnet. Alternatively, you can create an Internet Gateway. Check Connect to the internet using an internet gateway for more information. Consult with your security team to further restrict the instances’ egress network access.Enter a name and select one of the public subnets created in a previous step.
If you select a private subnet, the NAT gateway will not have access to Internet traffic.
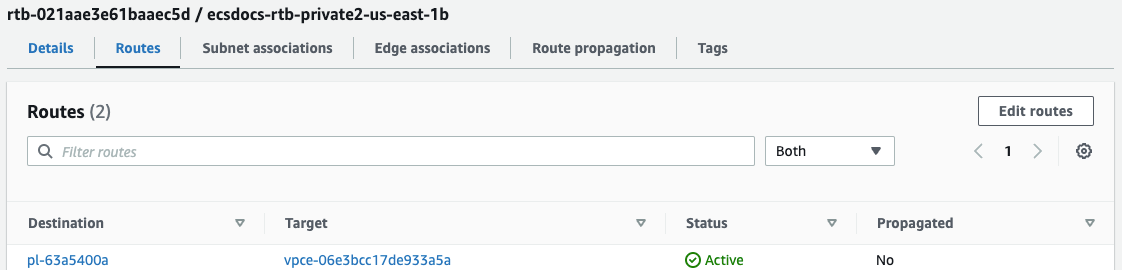
Click on one of the private subnets created in an earlier step and select “Routes” from the bottom section.
13. Create ECS Cluster
Navigate to the “Elastic Container Service” dashboard and select “Clusters” from the left side. Click “Create Cluster”.
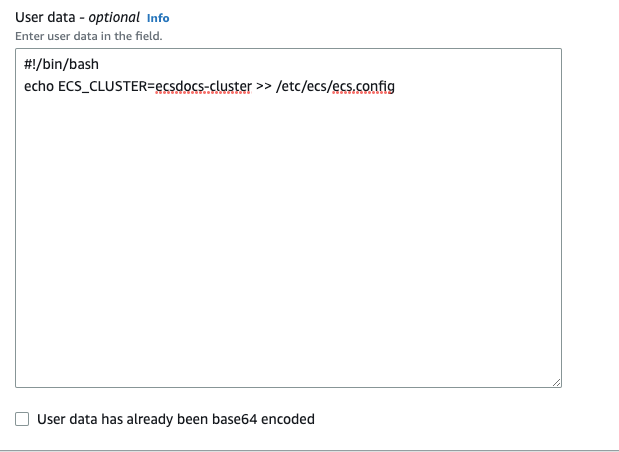
Enter the cluster name.
You must specify the same cluster name as you entered in the EC2 Launch Template - User Data section in a previous step.
For “Infrastructure”, check the “Amazon EC2 instances” checkbox.
“AWS Fargate (serverless)” is only suitable for cost-optimized deployments.
For “Amazon EC2 instances”, select the “Auto Scaling group” we created in the previous optional step.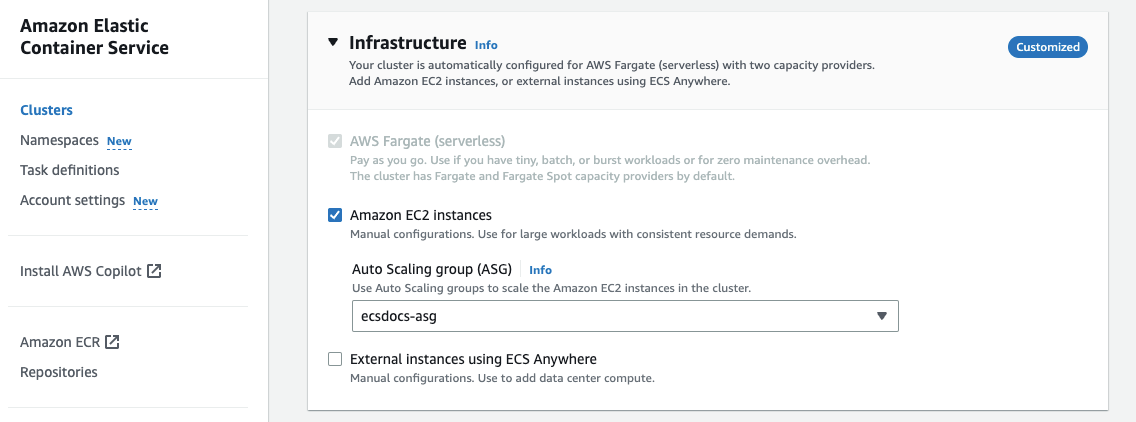
Optional - For “Monitoring - optional” enable container insights if you would like to monitor usage of container resources. This is recommended for production configurations.
14. Create Bastion and Create License
In order to add a file to the new EFS file system and troubleshoot any clustering issues, we will create an EC2 instance to serve as our Bastion Host.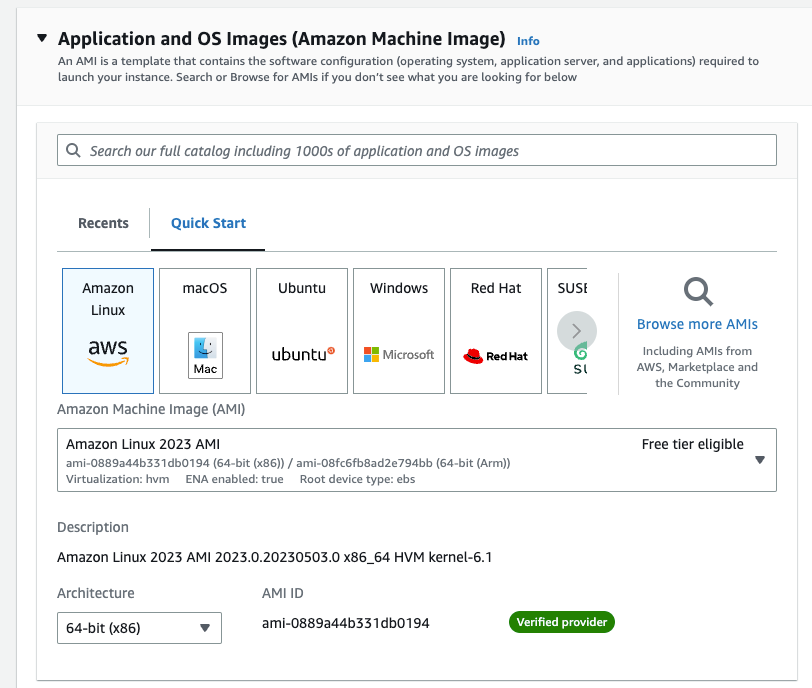
For “Key pair” select an appropriate SSH key to connect to the EC2 instance.
Creating an SSH key is beyond the scope of this document. Check Create key pairs for more information.
For “Subnet”, select an available subnet that is publicly accessible and has an EFS mount created in a previous step.
For “Firewall (security groups)” select “Select existing security group” and select the previously created security group for the bastion host.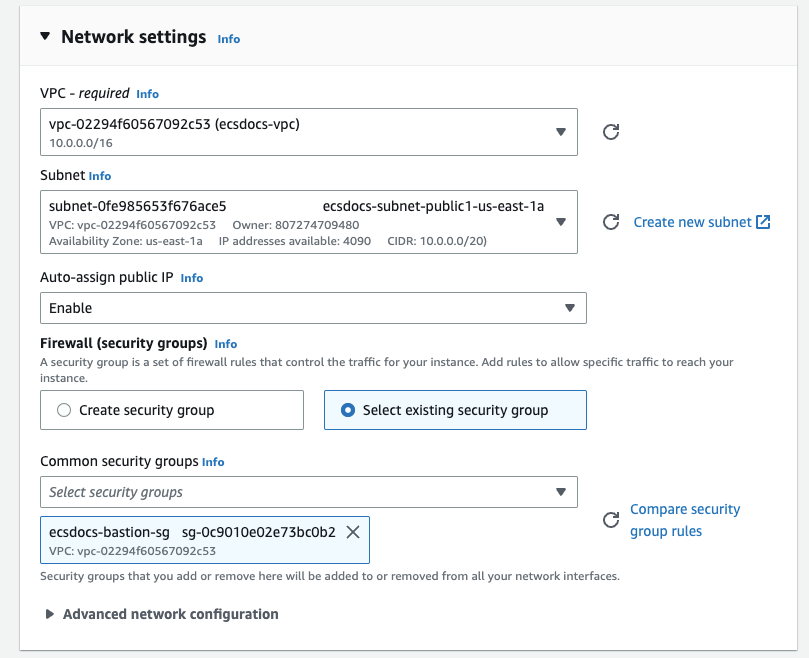
Navigate to the “EC2” dashboard and click “Instances” from the left, and then locate the newly created instance.
Once the instance has started, log into it via SSH. The mechanism to do this is beyond the scope of this document. Check Connect to your Linux instance using SSH for more information.
There are multiple ways to manage files on an EFS filesystem, which are beyond the scope of this document.
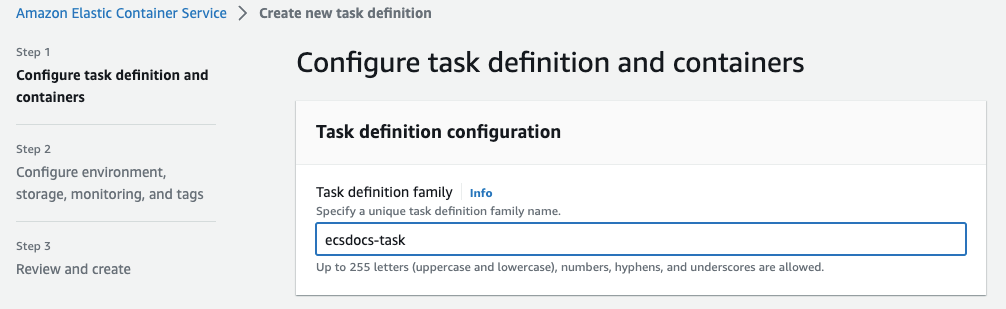
15. Create ECS Task Definition
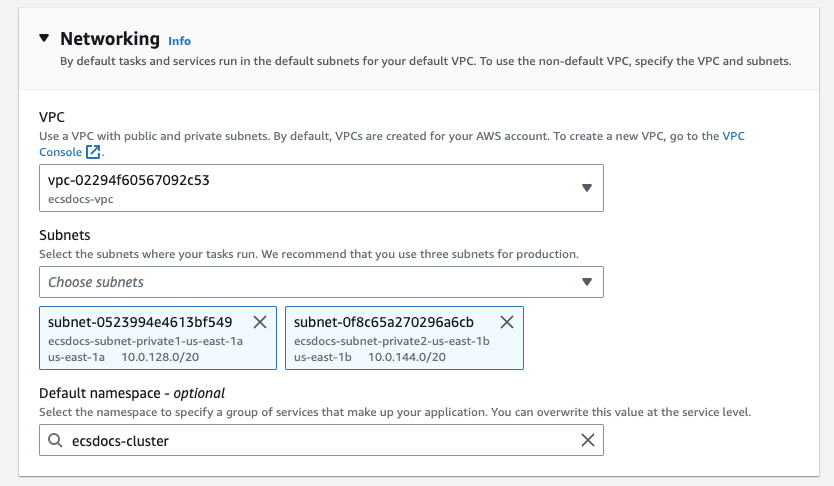
In order to run the Limina De-identification container, ECS requires a task definition to find the image, allocate the correct resources, etc. Follow the steps below to create the ECS Task Definition.From the Elastic Cluster Service dashboard, select “Task definitions” and click “Create new task definition”.
For Task role and Task execution role select “ecsTaskExecutionRole”.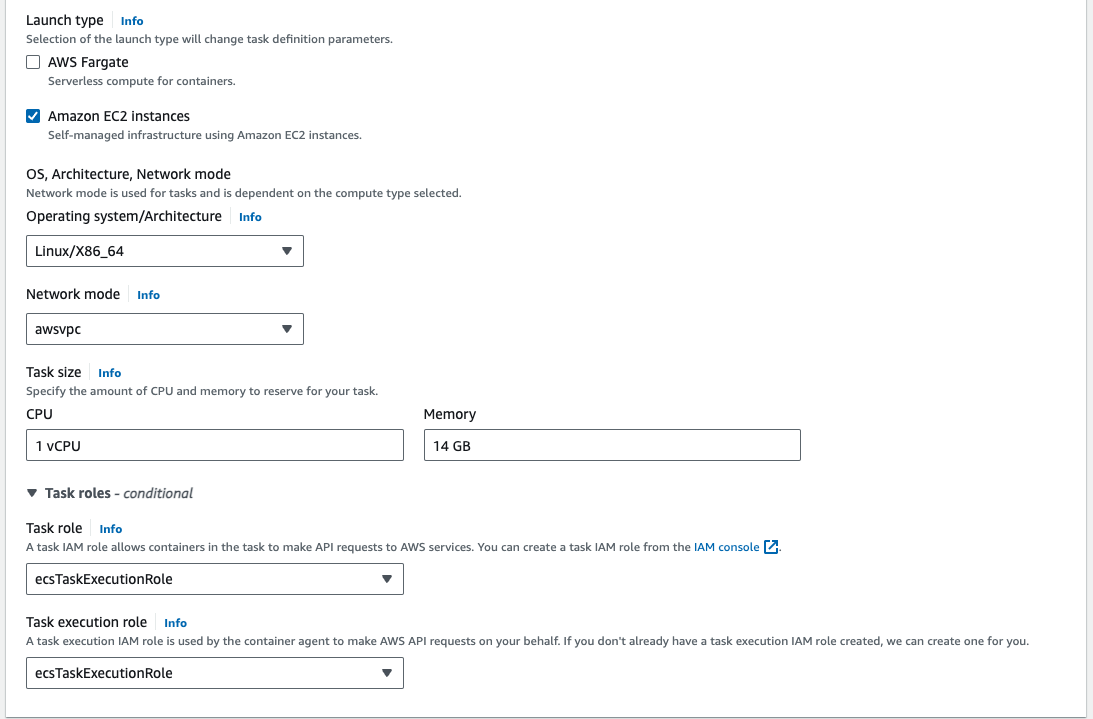
If the ecsTaskExecutionRole does not exist, follow the Amazon ECS task execution IAM role guide.
For Container - 1, enter a Name and the Image URI created in a previous step, and set Essential container to “Yes”.
Leave the Resource allocation limits - conditional empty. We will allow the container to consume all resources available to the task.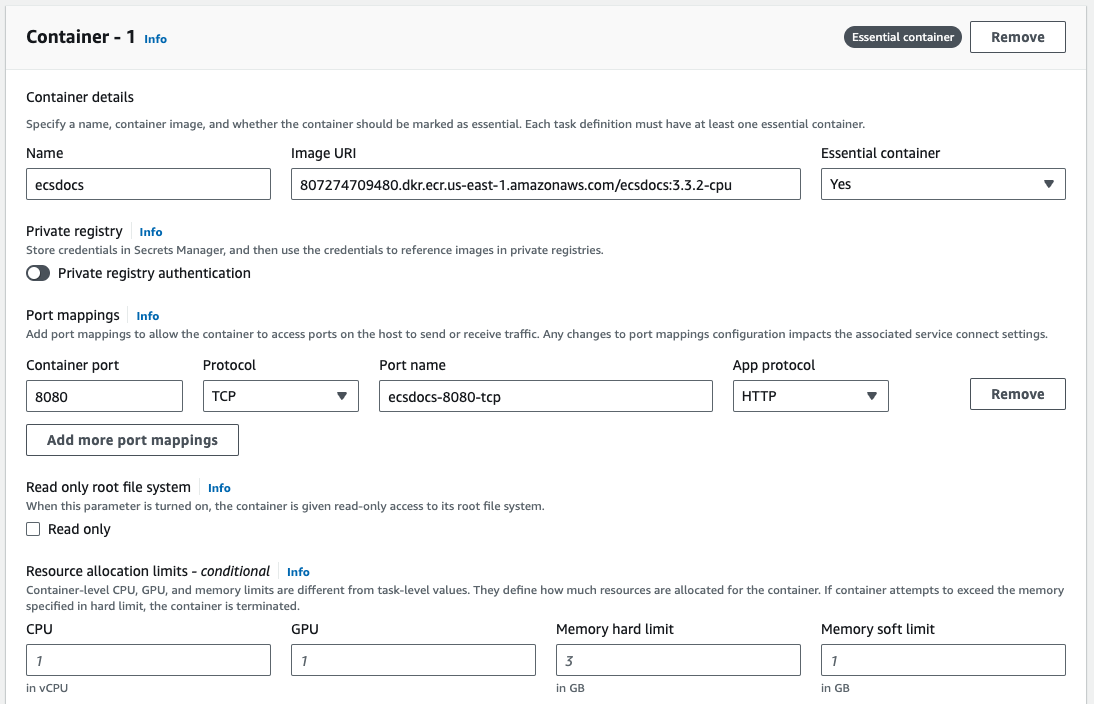
For Logging, optionally enable log collection. Sample values are depicted below.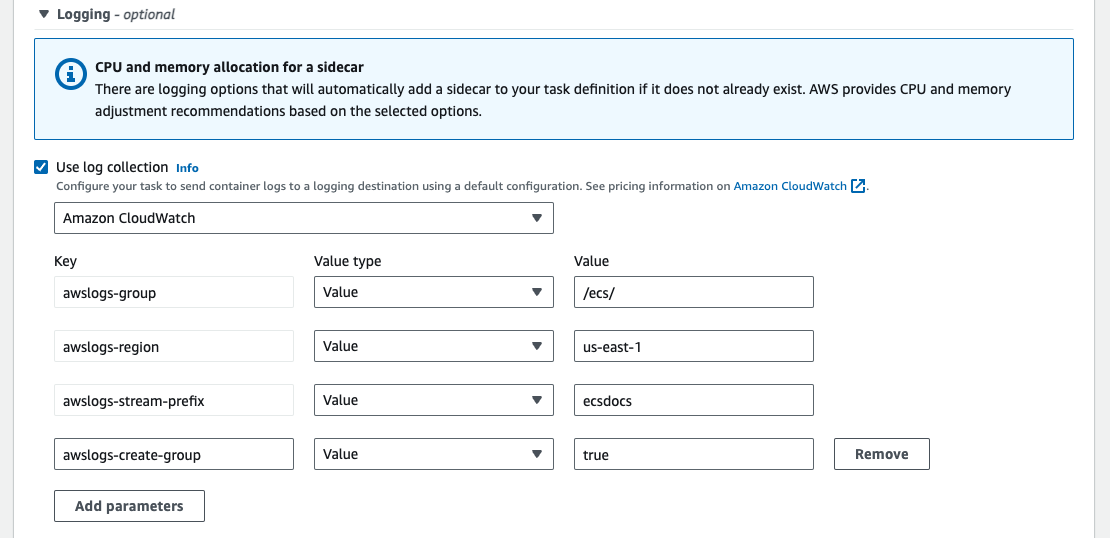
If you plan to have CloudWatch Log Groups automatically created, you must add the “CloudWatchLogsFullAccess” policy to the “ecsTaskExecutionRole”. Follow the Adding and removing IAM identity permissions guide.
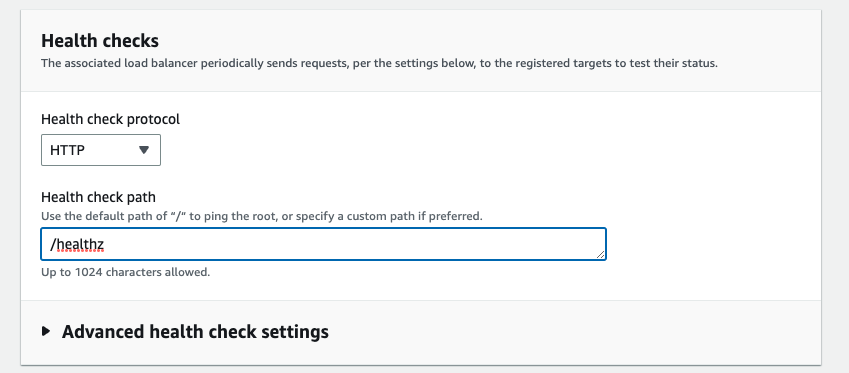
For HealthCheck, enter the following details. The command is 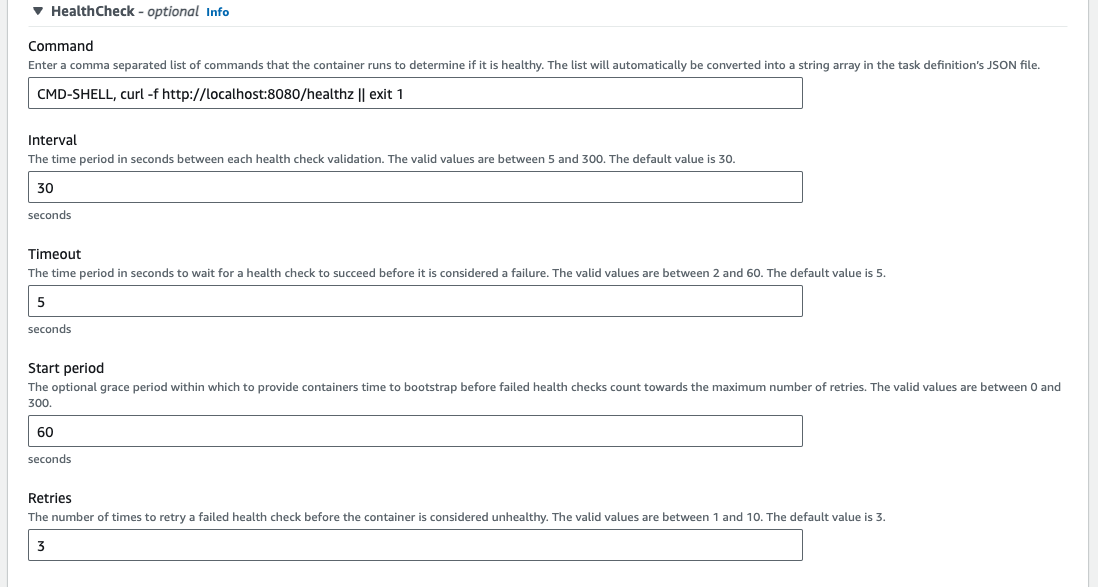
CMD-SHELL, curl -f http://localhost:8080/healthz || exit 1 for the health check, “Interval” is 30, “Timeout” is 5, “Start period” is 60, and “Retries” is 3.Leave Container timeouts, Docker configuration, Resource limits (Ulimits), and Docker labels empty.
For storage, select “EFS” for the Volume type, enter a Volume name, select the File system ID created previously, and leave the Root directory and Access point ID as default.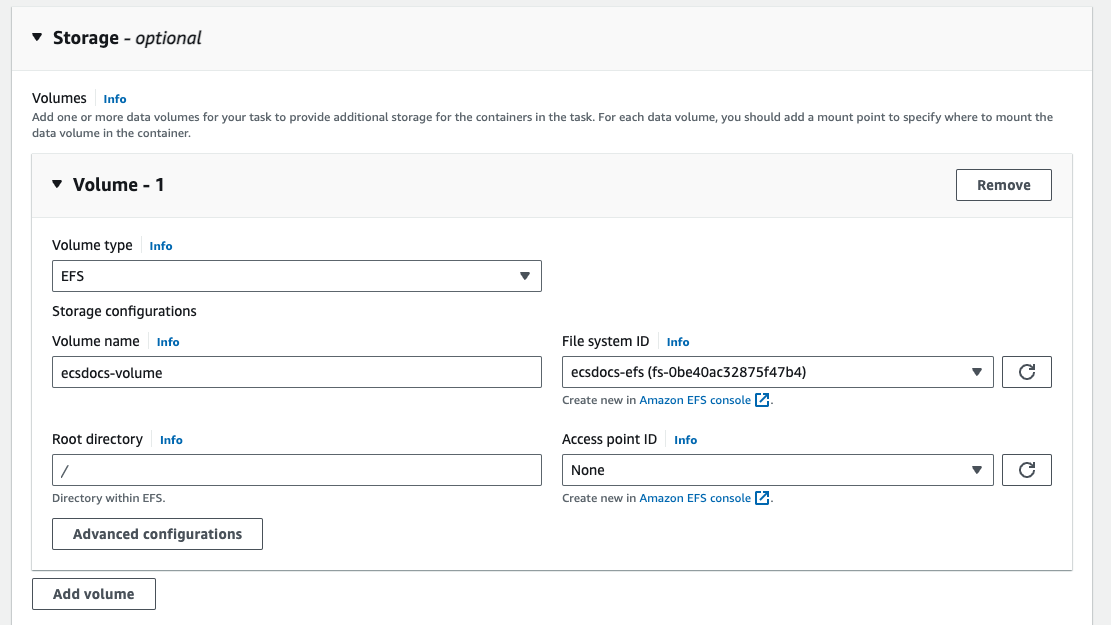
Select the Container and Source volume created previously, enter a Container path of 
/app/license and check the Read only box.Container Definition
16. Create ECS Service
In order to run the Limina De-identification container in the ECS Cluster, we will define an ECS Service to maintain a healthy number of containers.Navigate to the “Amazon Elastic Container Service > Clusters” dashboard, select the previously created cluster.
For “Environment”, select the “Capacity provider strategy” compute option to use the EC2 underlying infrastructure.
For “Deployment configuration”, select the “Service” Application type, the task definition family previously created, and enter a Service name.
Optional - Specify values for “Desired tasks”, “Min running tasks %”, “Max running tasks %”, and “Deployment failure detection” settings. For the purposes of this document, we will leave the “Desired tasks” at 1, and the other options as default.
For “Networking”, under “Security group” remove the default security group and add the previously created security group for ECS.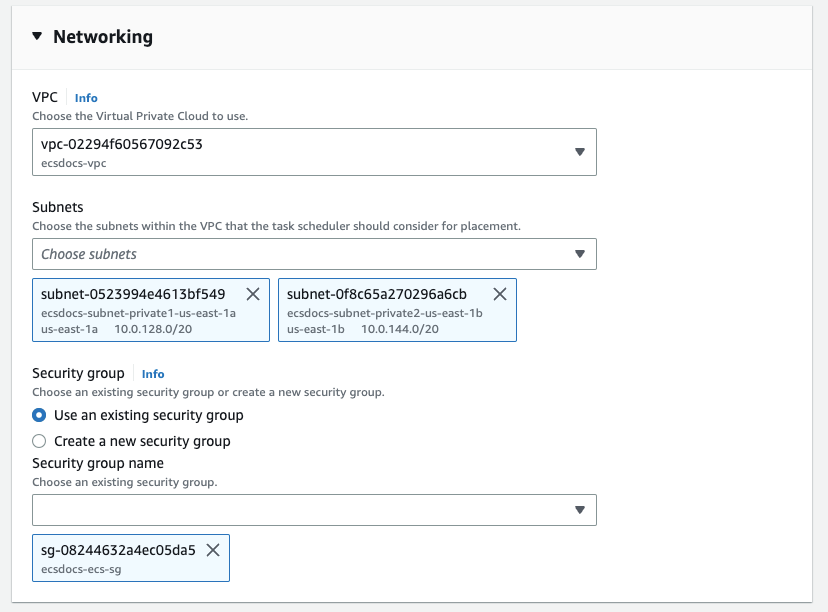
For “Load balancing - optional” leave the default “Load balancer type” to “Application Load Balancer”.
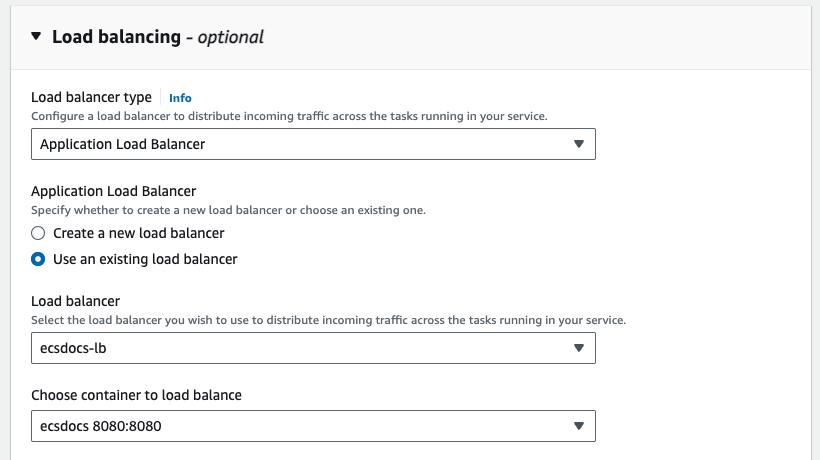
For “Listener” select “Use and existing listener” and select the listener created in a previous section.
Once the service has finished deploying, check the Tasks tab to find the deployed ECS task instance.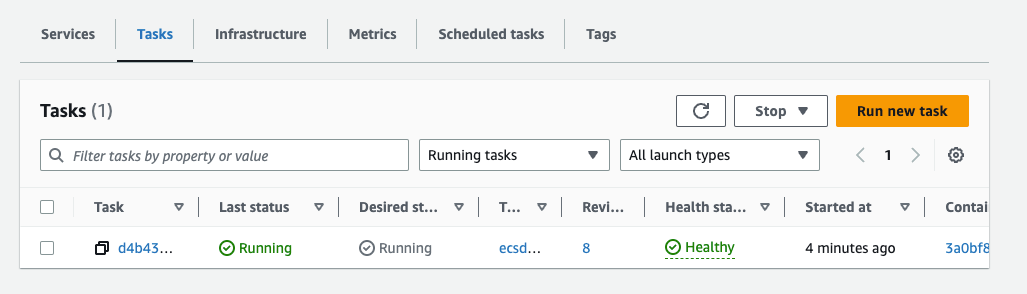
Click on the task and scroll down to the “Configuration” section of the task to find the “Private IP” address.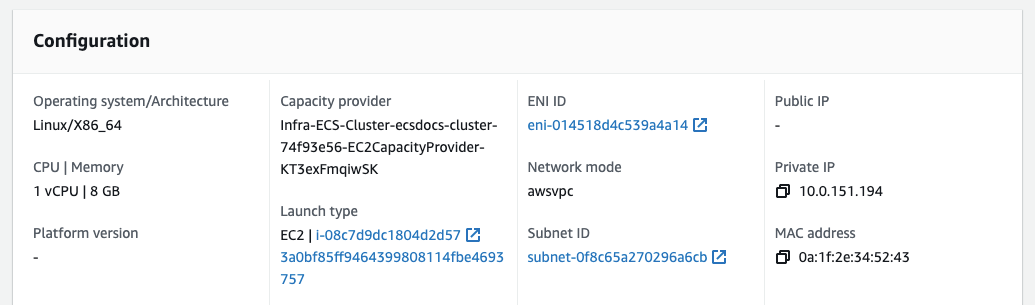
Run the following command to test that the Limina De-identification service is reachable. You should receive a JSON object response which contains the app version, such as below.
curl Command